November 08, 2026 - Coaching Business
How to Build a Coaching Website That Attracts Clients
How do you build a coaching website that successfully attracts clients? This guide walks through every step, from choosing your platform to publishing your page.
Even with good life coaching session templates, most coaches struggle to attract clients online because their website doesn't do its job. It speaks to the wrong person, fails to build enough trust, and makes it just a little too hard to take the next step.
Building a coaching site that converts starts with getting those fundamentals right. In this article, I will walk through how to set up your coaching website step by step and connect it to an existing site if you already have one.
What Your Coaching Website Needs to Do
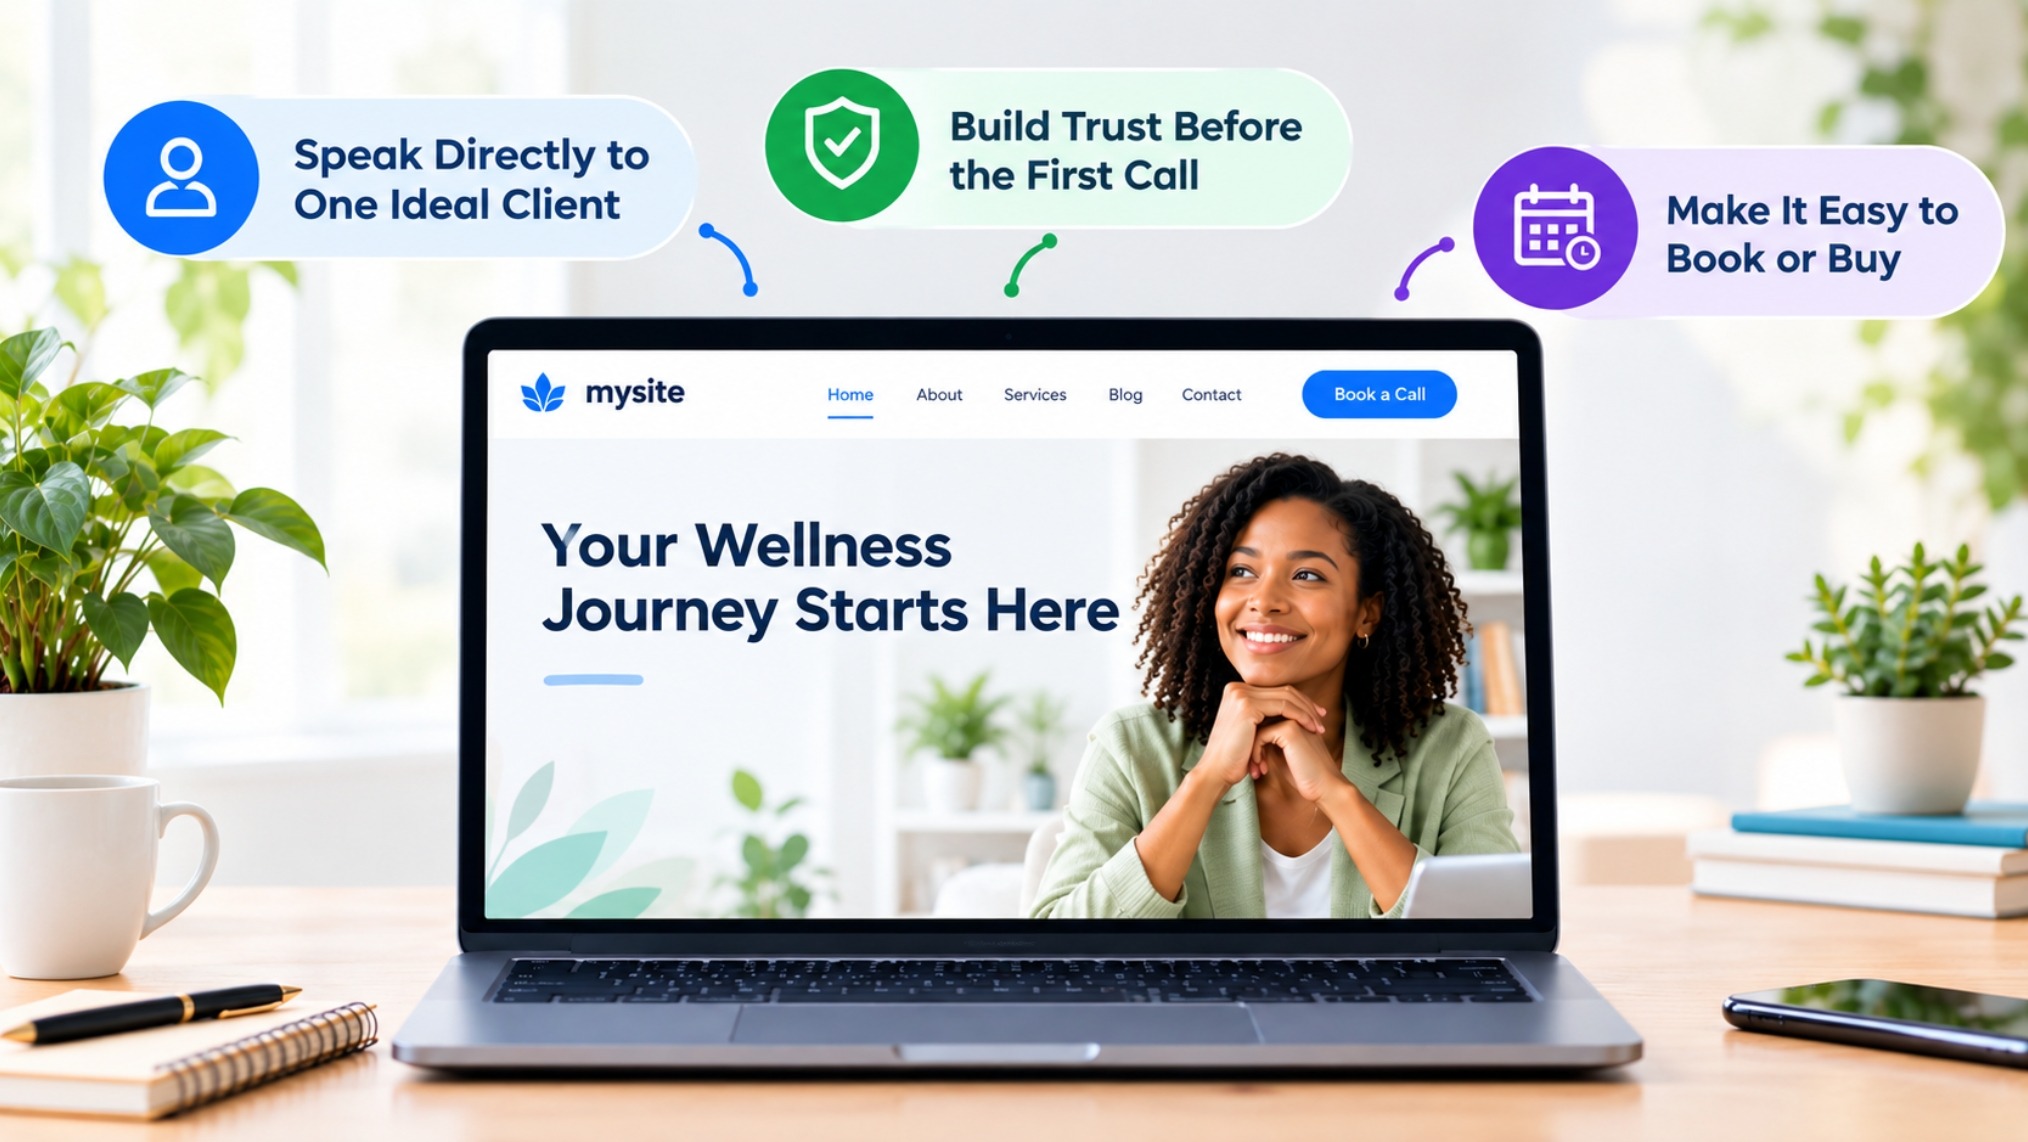
Speak Directly to One Ideal Client
Most coaches launch websites that try to speak to everyone. A career coach, a life coach, a wellness coach, and a relationship coach all have different clients with very different fears, obstacles, and goals.
A homepage that reads "I help people live their best lives" is too generic and tells no one anything useful. Your website should be built around a specific, well-defined person.
Being bold and specific about who you serve, from the language to the layout, makes your message land with the right people. That specificity is what makes a visitor feel seen and understood when they visit your website
Build Trust Before the First Call
Reaching out to a coach can feel vulnerable, especially for someone who has never worked with one before. Your website is one of the first touchpoints when someone is considering your services.
Client testimonials are one of the most effective ways to show what they can expect from the experience.
A professional photo, a short bio that sounds like a real person wrote it, and your credentials also contribute to building your credibility.
A personal video takes it even further. When a potential client can hear your voice and see your face before committing to a call, the barrier to reaching out drops significantly.
Make It Easy to Book or Buy
A visitor should never have to scroll back to the top, check a sidebar, or click through three pages to find out how to work with you. That’s where most coaches easily lose clients.
Your booking option, whether that's a scheduling button, an embedded calendar, or a program sign-up page, needs to be within reach at the natural stopping points of your page.
"Book a Discovery Call" is more actionable than "Contact Me." The fewer steps between interest and action, the more likely visitors are to follow through.
How to Create and Set Up a Coaching Website
Step 1: Choose Your Website Platform
Your platform choice depends on what you need your site to do. If you want full creative control and already have design experience, WordPress or Squarespace give you the flexibility to build anything.
For coaches who want something simpler and faster to set up, CoachVantage includes a built-in webpage builder. With the builder, you can create a professional public page for your coaching business, without setting up a separate website.
If you're just starting out and want to get something live quickly, consider a coaching tool with a built-in page builder before investing in a standalone website.
Step 2: Choose Your Domain
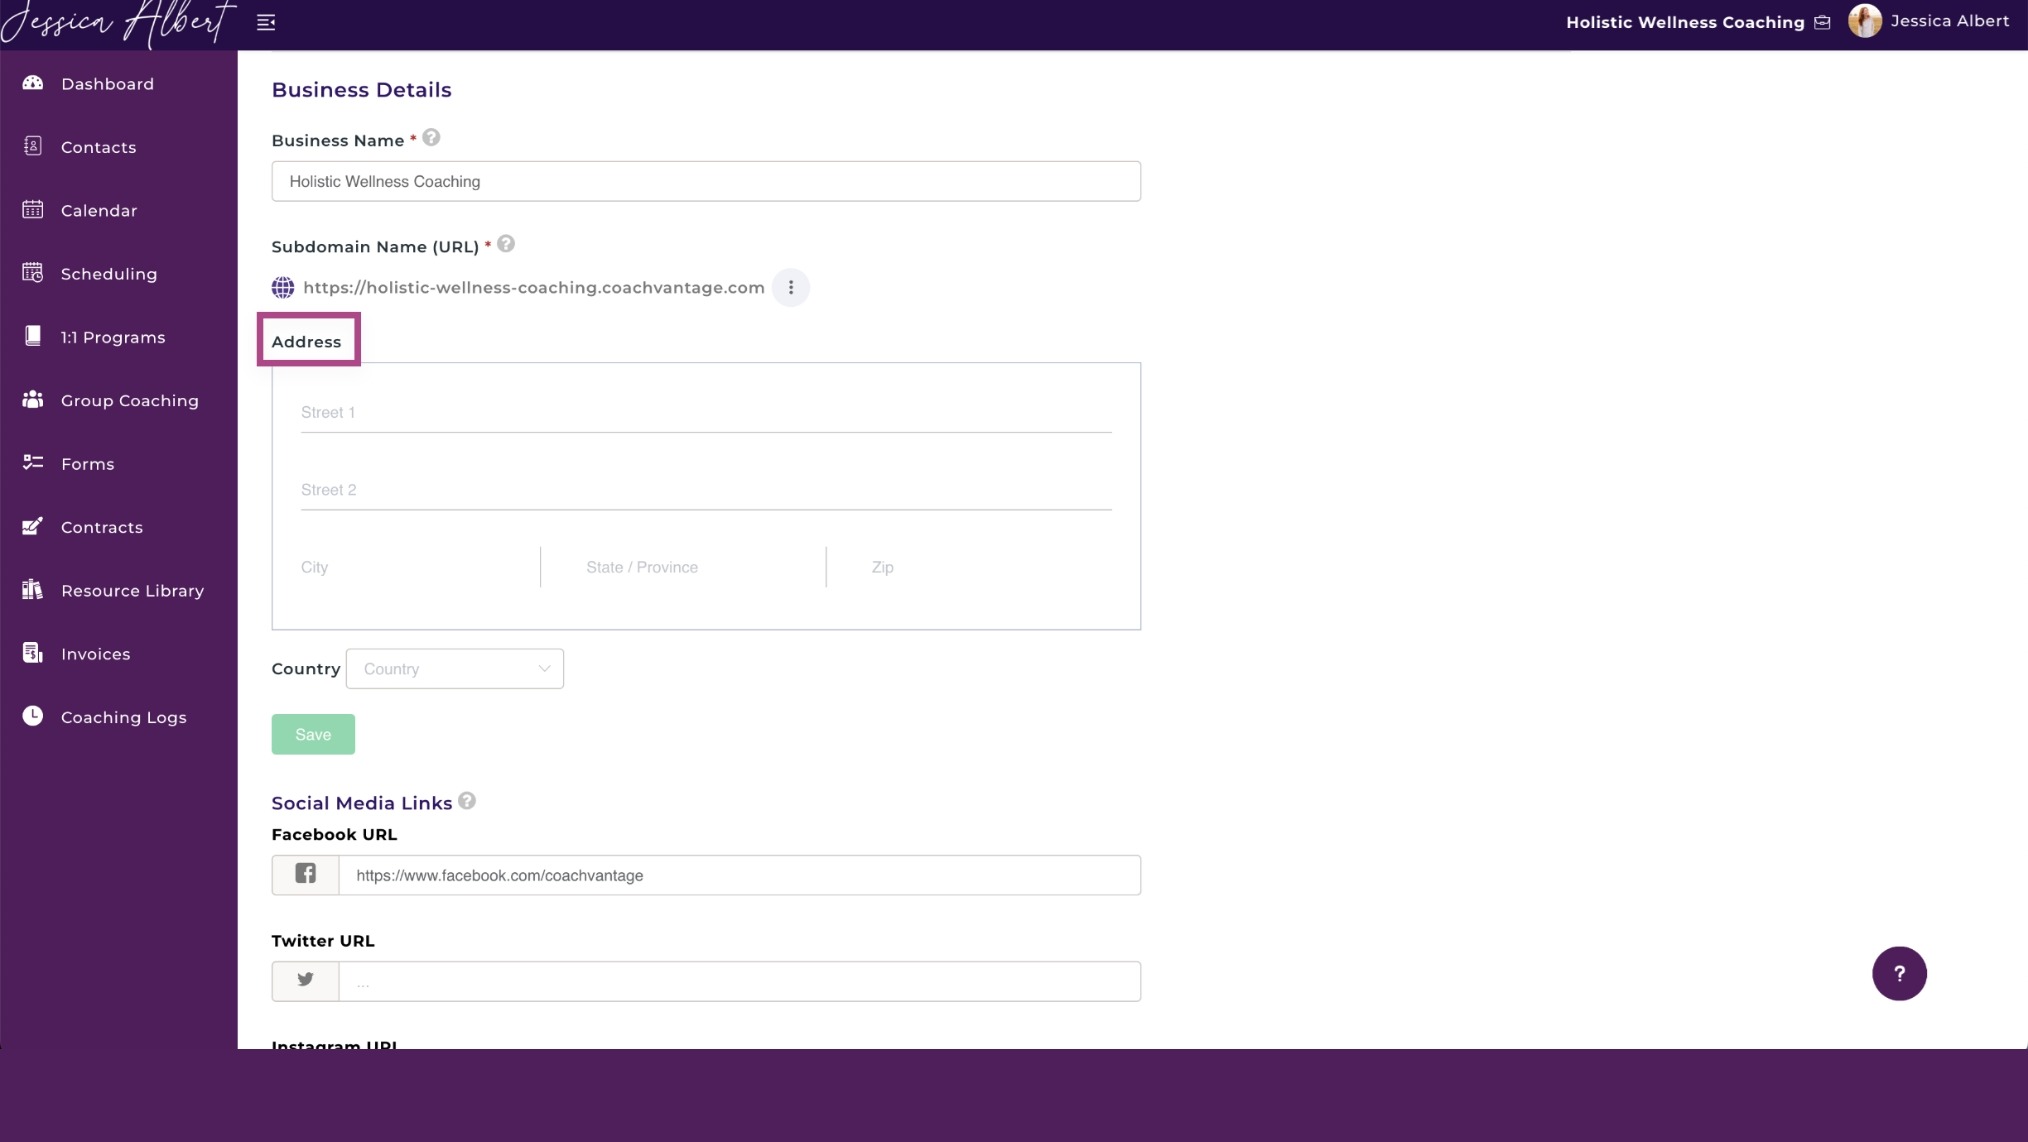
Your domain is your web address, the URL people type in or click to find you. If you're building on WordPress or Squarespace, you can purchase a custom domain like ‘yourname.com’ directly through the platform or a registrar like Namecheap or Google Domains.
CoachVantage provides a subdomain for your public page, so your URL will follow a format like yourname.coachvantage.com.
If you already have a website with a custom domain, you can embed your CoachVantage page within it using the HTML embed options covered later in this article.
Step 3: Access Your Webpage
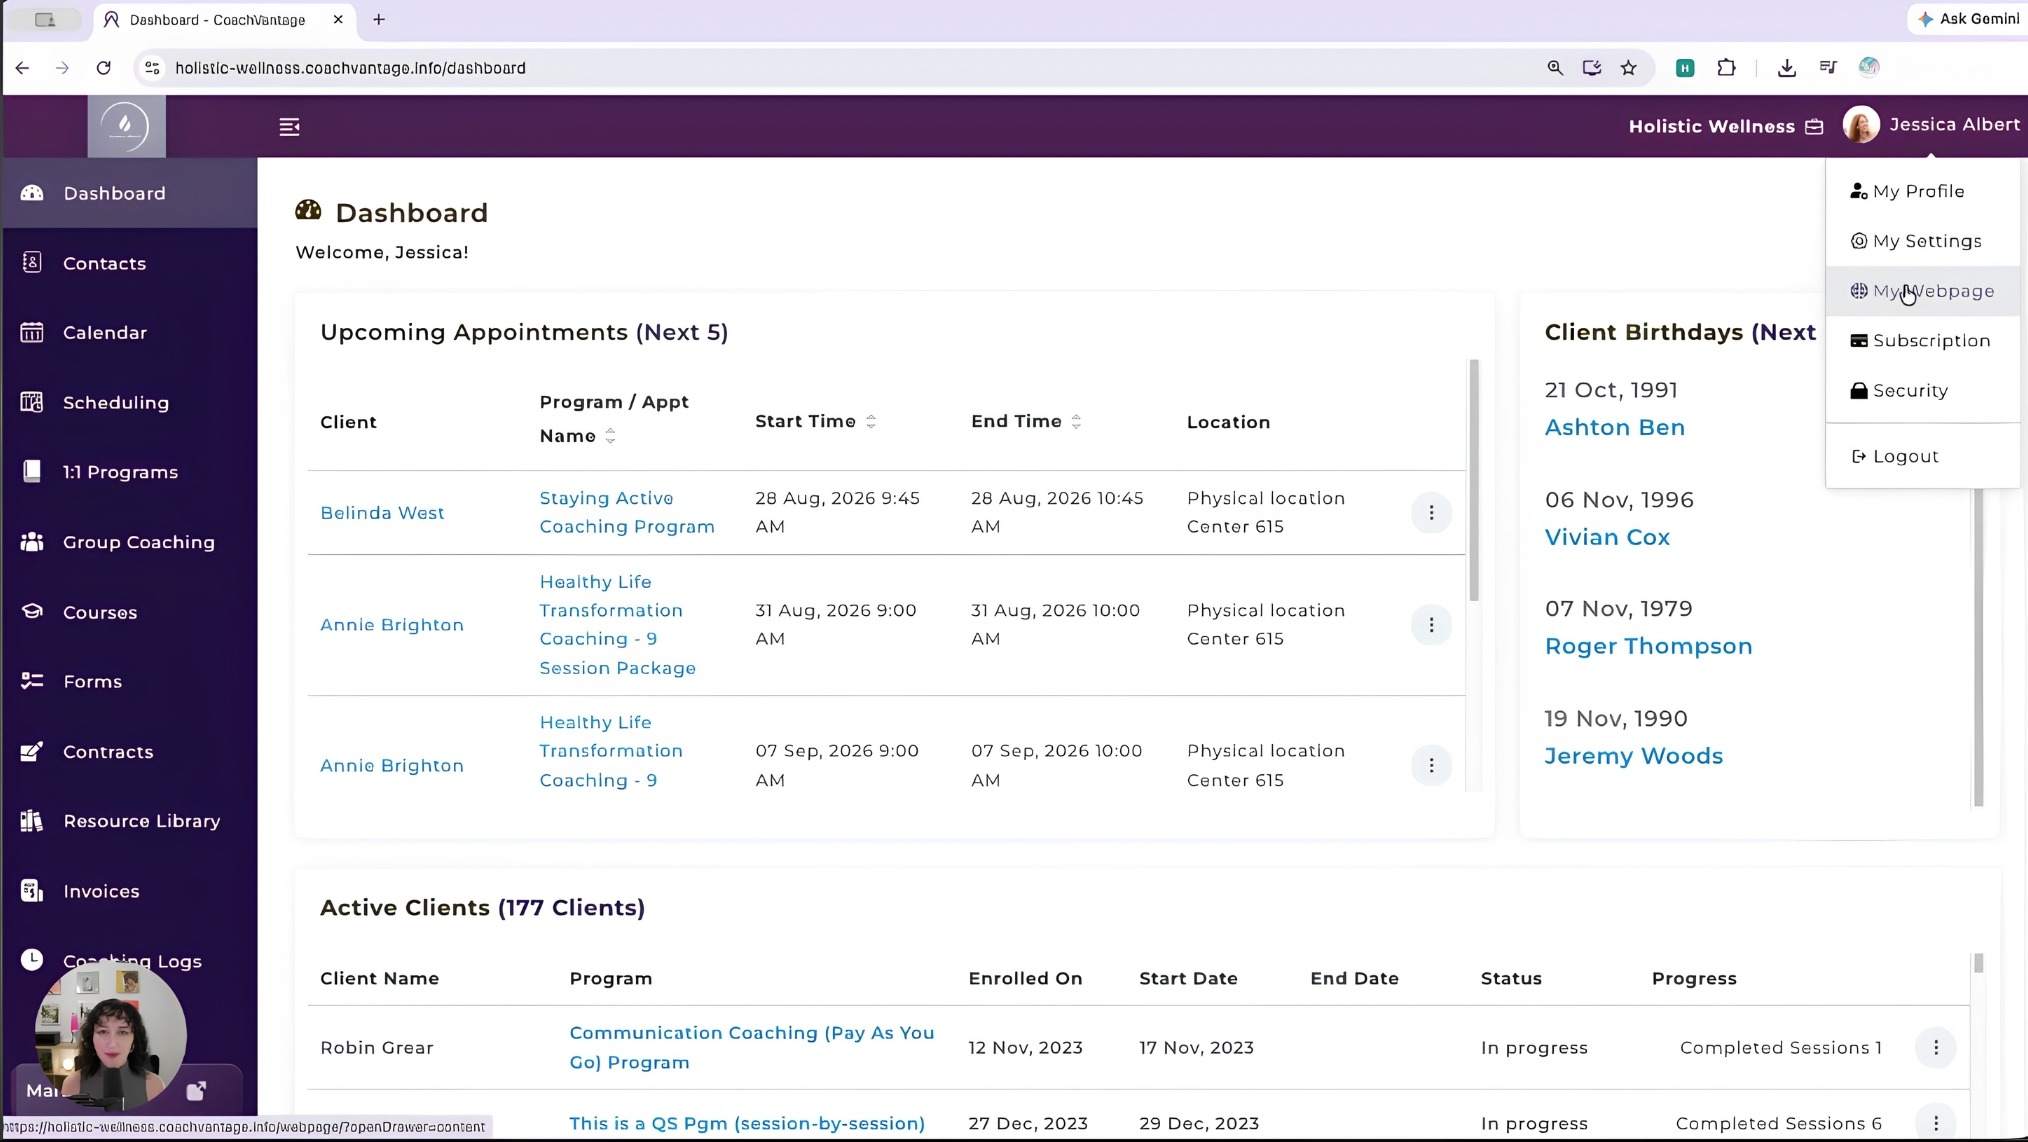
To access your CoachVantage webpage, go to your Dashboard, select your name in the top-right corner, and select My Webpage.
Your public webpage opens from there, where you can preview the visitor experience or open the editor to begin customizing.
The Customize My Webpage editor includes sections for Content, Layout and Branding, Offerings, My Profile, and More, which cover Appointment Booking, Testimonials, FAQs, SEO, and Website Embed.
Step 4: Set Your Header and Banner Image
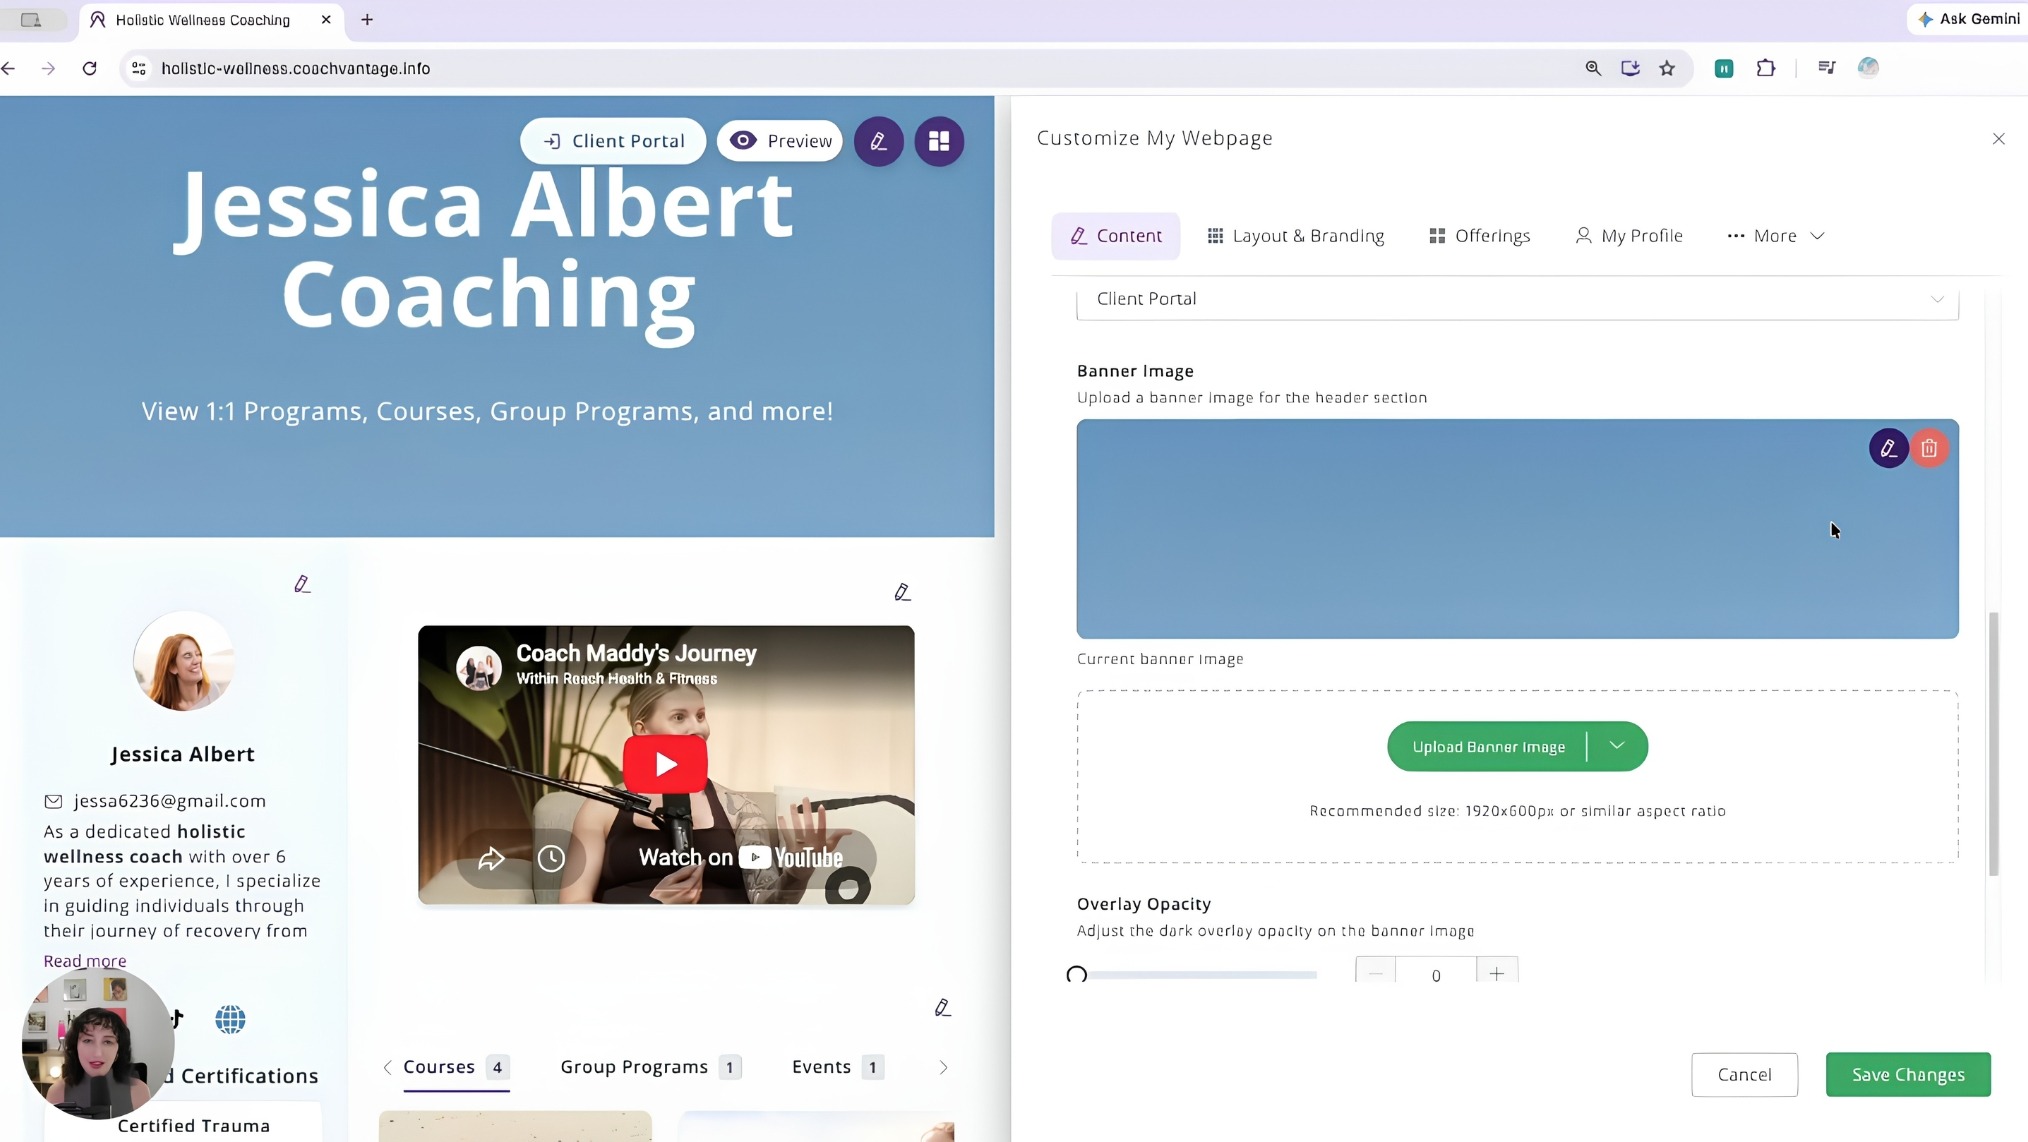
Your header is the first thing a visitor reads. It should state clearly who you are and who you help.
Something like "Helping mid-career professionals find work that actually fits" tells a story in one line, which is more useful than just listing your name and niche.
For the banner image, the recommended size is 1920 x 600 pixels or an image with a similar aspect ratio. You can adjust the overlay opacity to make your header text easier to read over the image.
Step 5: Add a Welcome Video
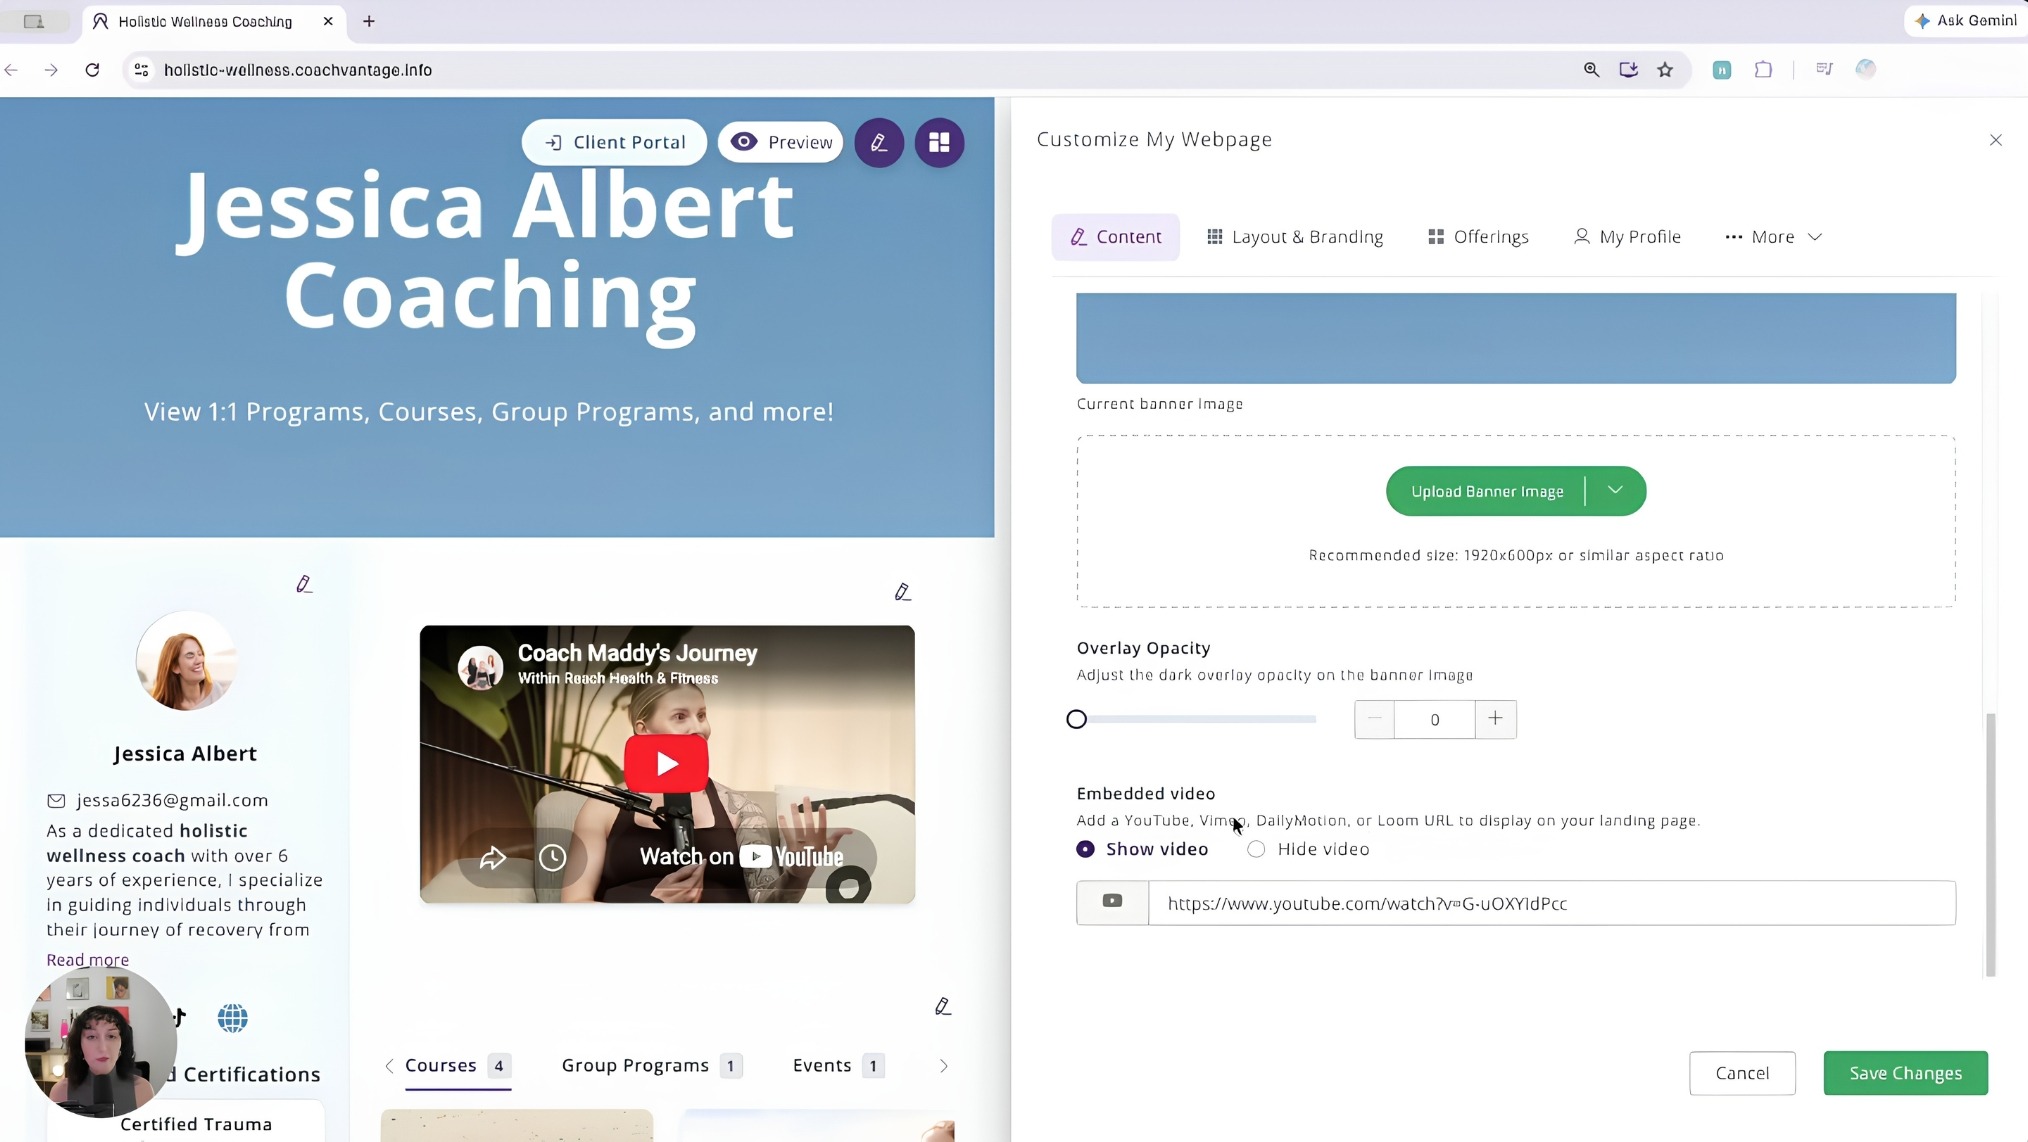
A short video, even two or three minutes, does more trust-building work than most coaches think.
CoachVantage supports embedded videos from YouTube, Vimeo, and Dailymotion, and a welcome video gives prospective clients a chance to hear your approach before they commit to a call.
You don't need a production studio. A well-lit space, a decent camera, and a clear message about who you help and how is enough.
Step 6: Choose a Layout and Apply Your Brand Colors
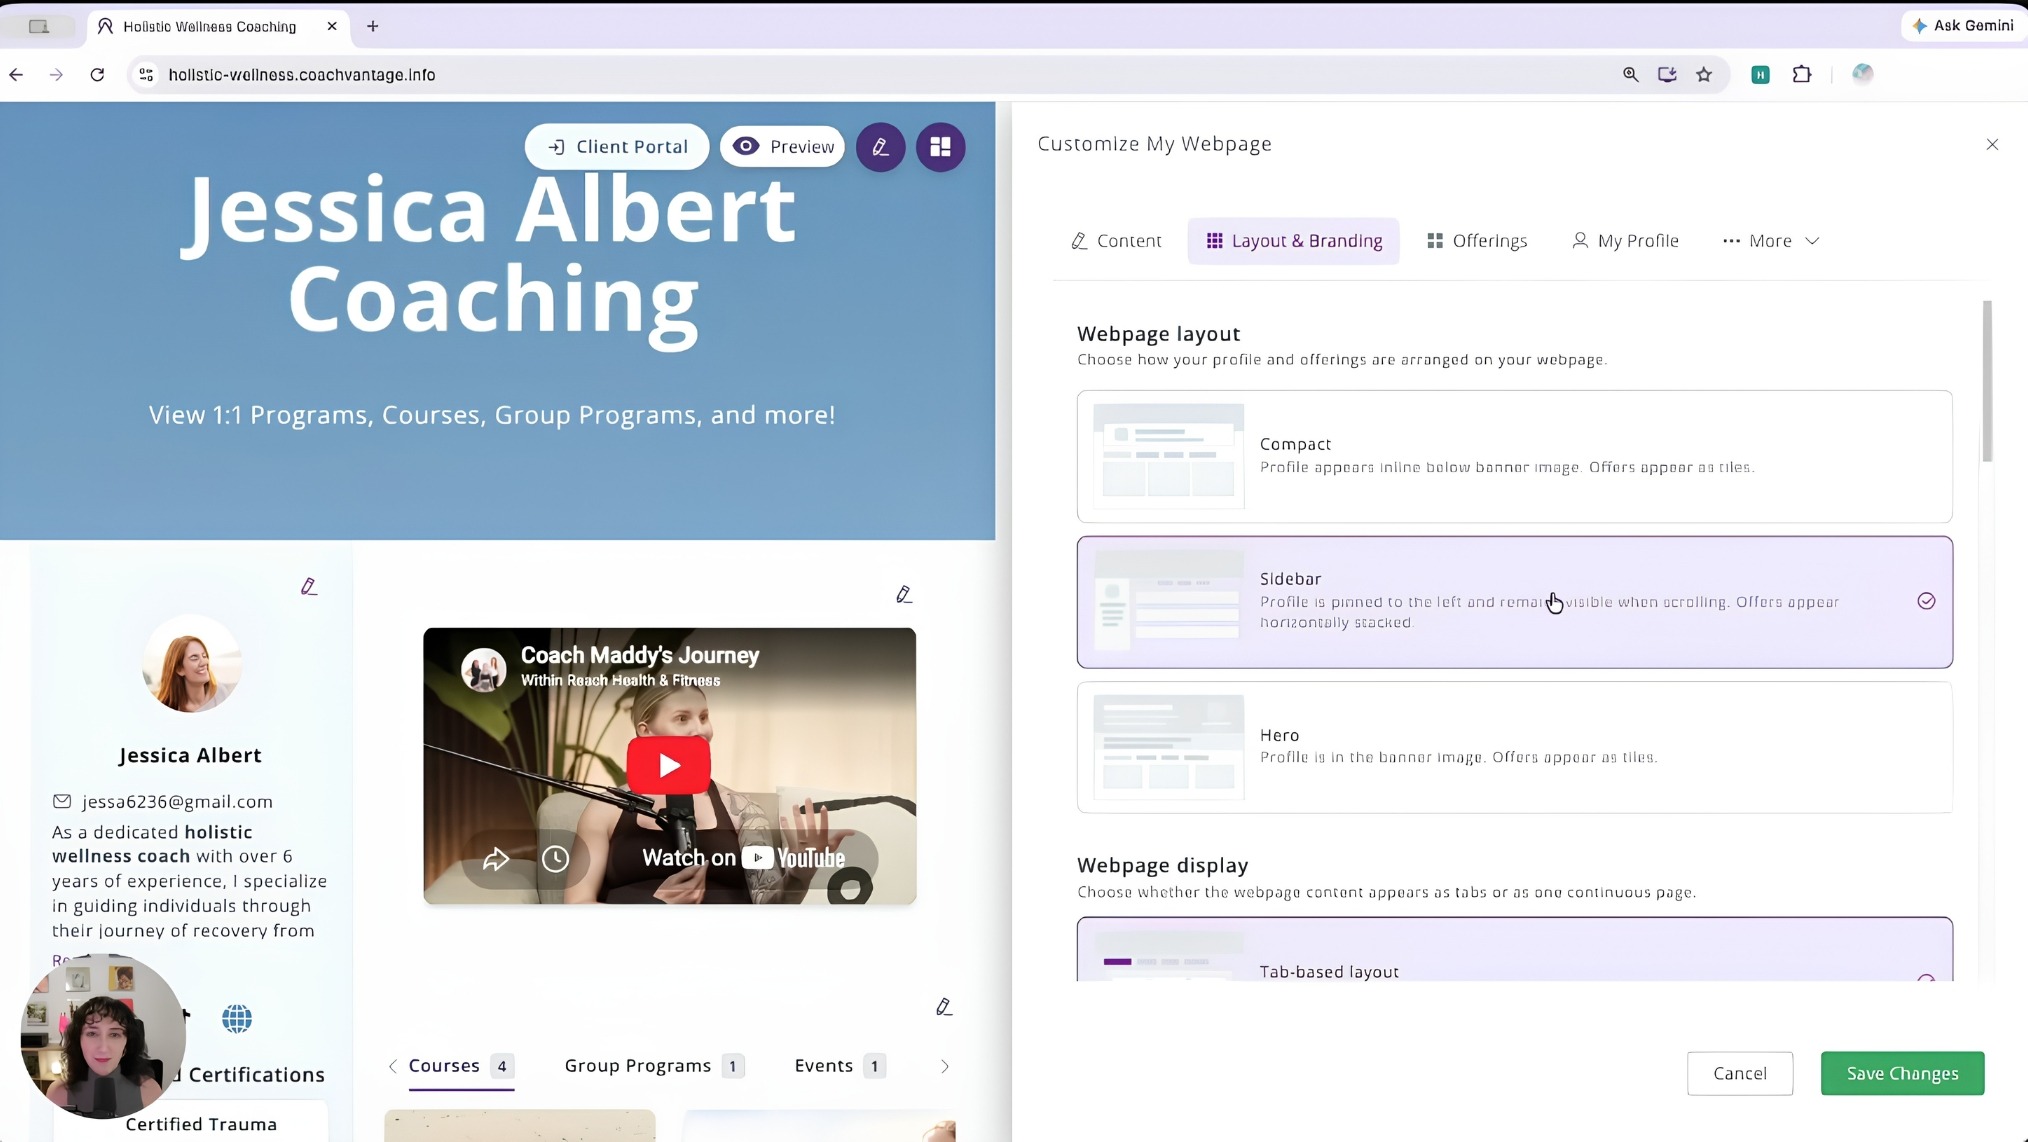
CoachVantage makes personal branding very easy with three layout options:
Compact displays your profile in a condensed format while keeping offerings easy to browse.
Sidebar places your Coach Profile in a sidebar alongside the rest of your content.
Hero features your profile in the banner area and displays your offerings as tiles.
You can also customize font family, base font size, primary brand color, header text color, and content text color.
Font and body text sizes adjust automatically based on your selected base font size to keep the visual hierarchy consistent.
Step 7: Add Your Licenses and Credentials
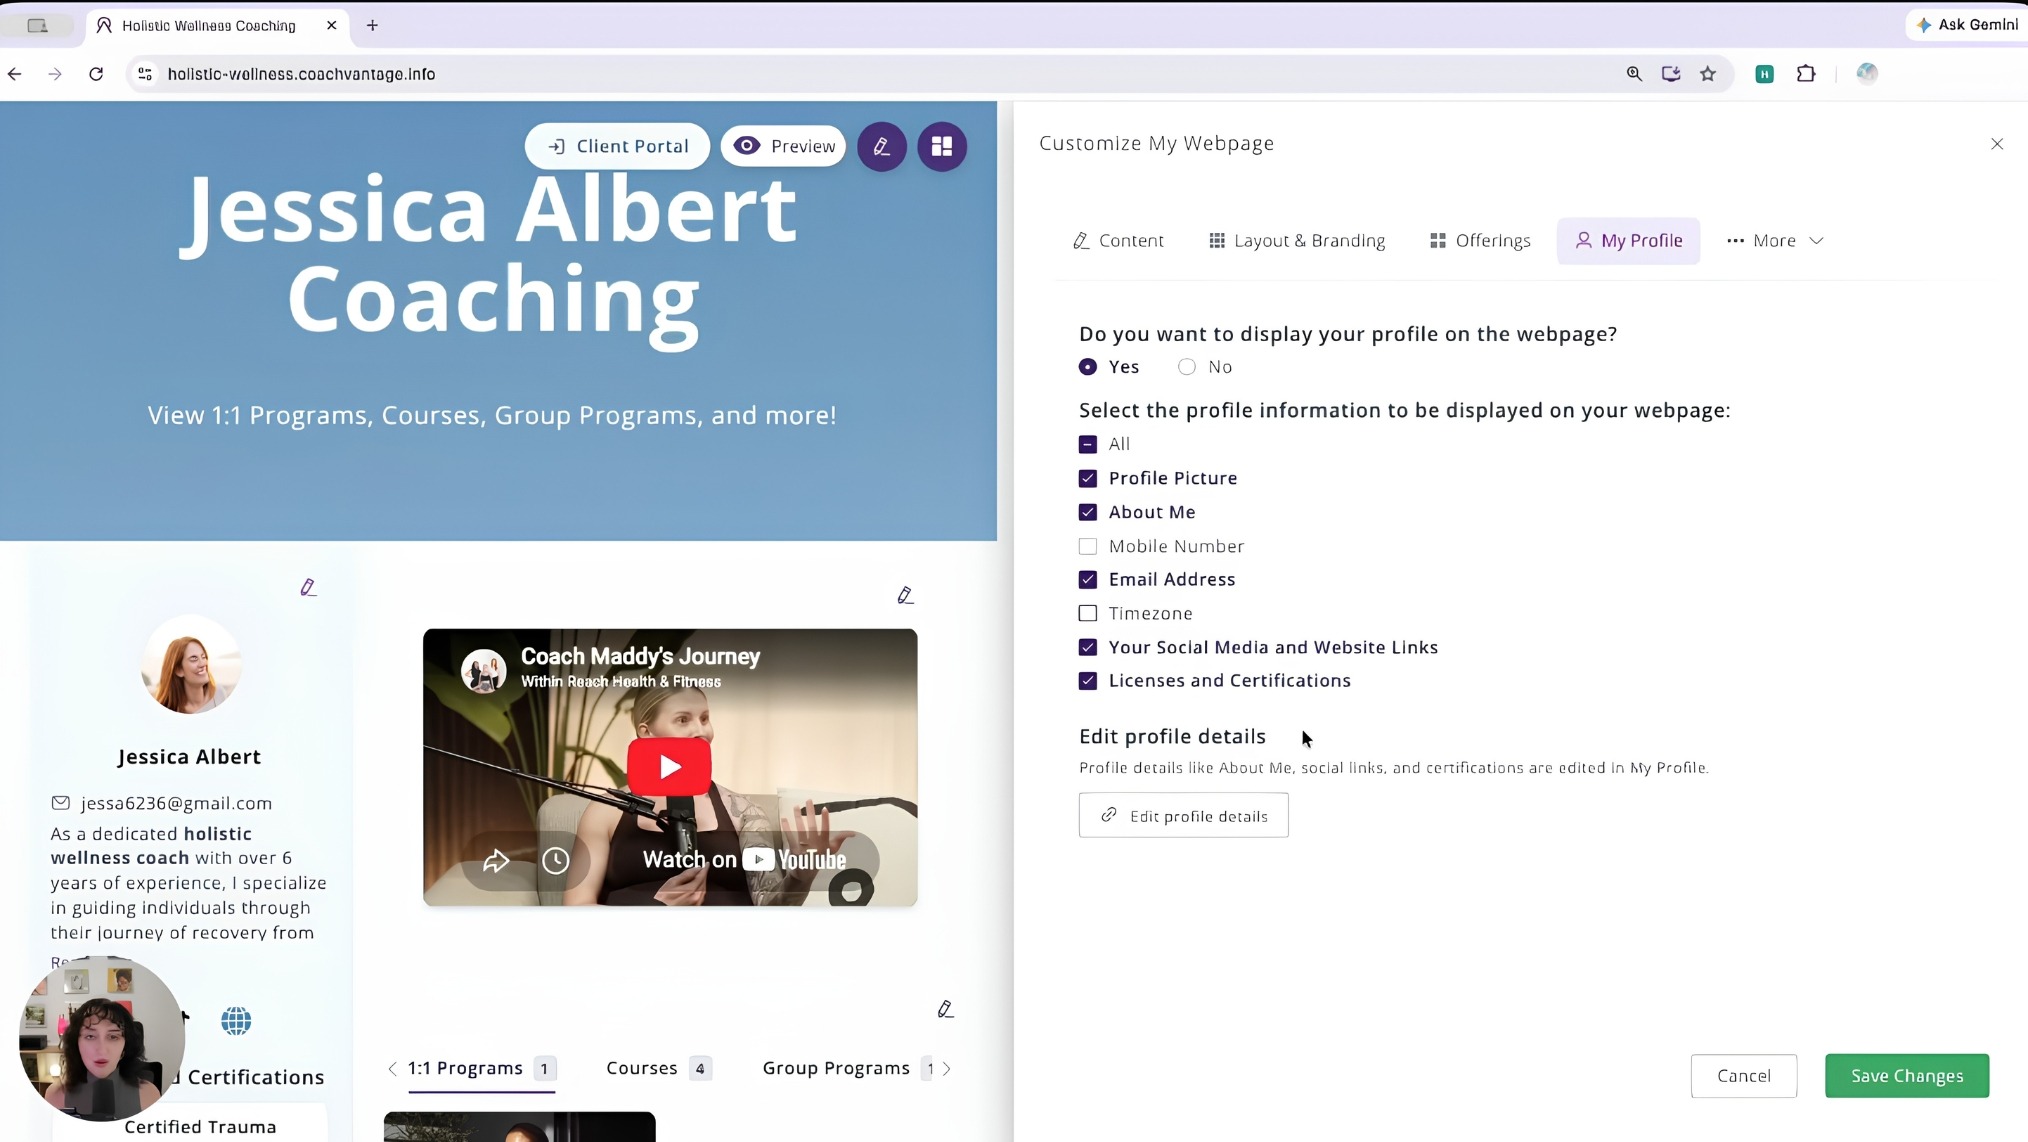
Your coach profile, biography, social links, website, and licenses or certifications can all appear on your webpage. In the My Profile section of the editor, you control which details are visible publicly.
Credentials from bodies like the International Coach Federation (ICF) are worth displaying if you hold them. Prospective clients often look out for them.
Also, a bio that reads like a person wrote it goes a long way toward making someone feel comfortable enough to reach out.
Step 8: Display Your Programs, Courses, and Events
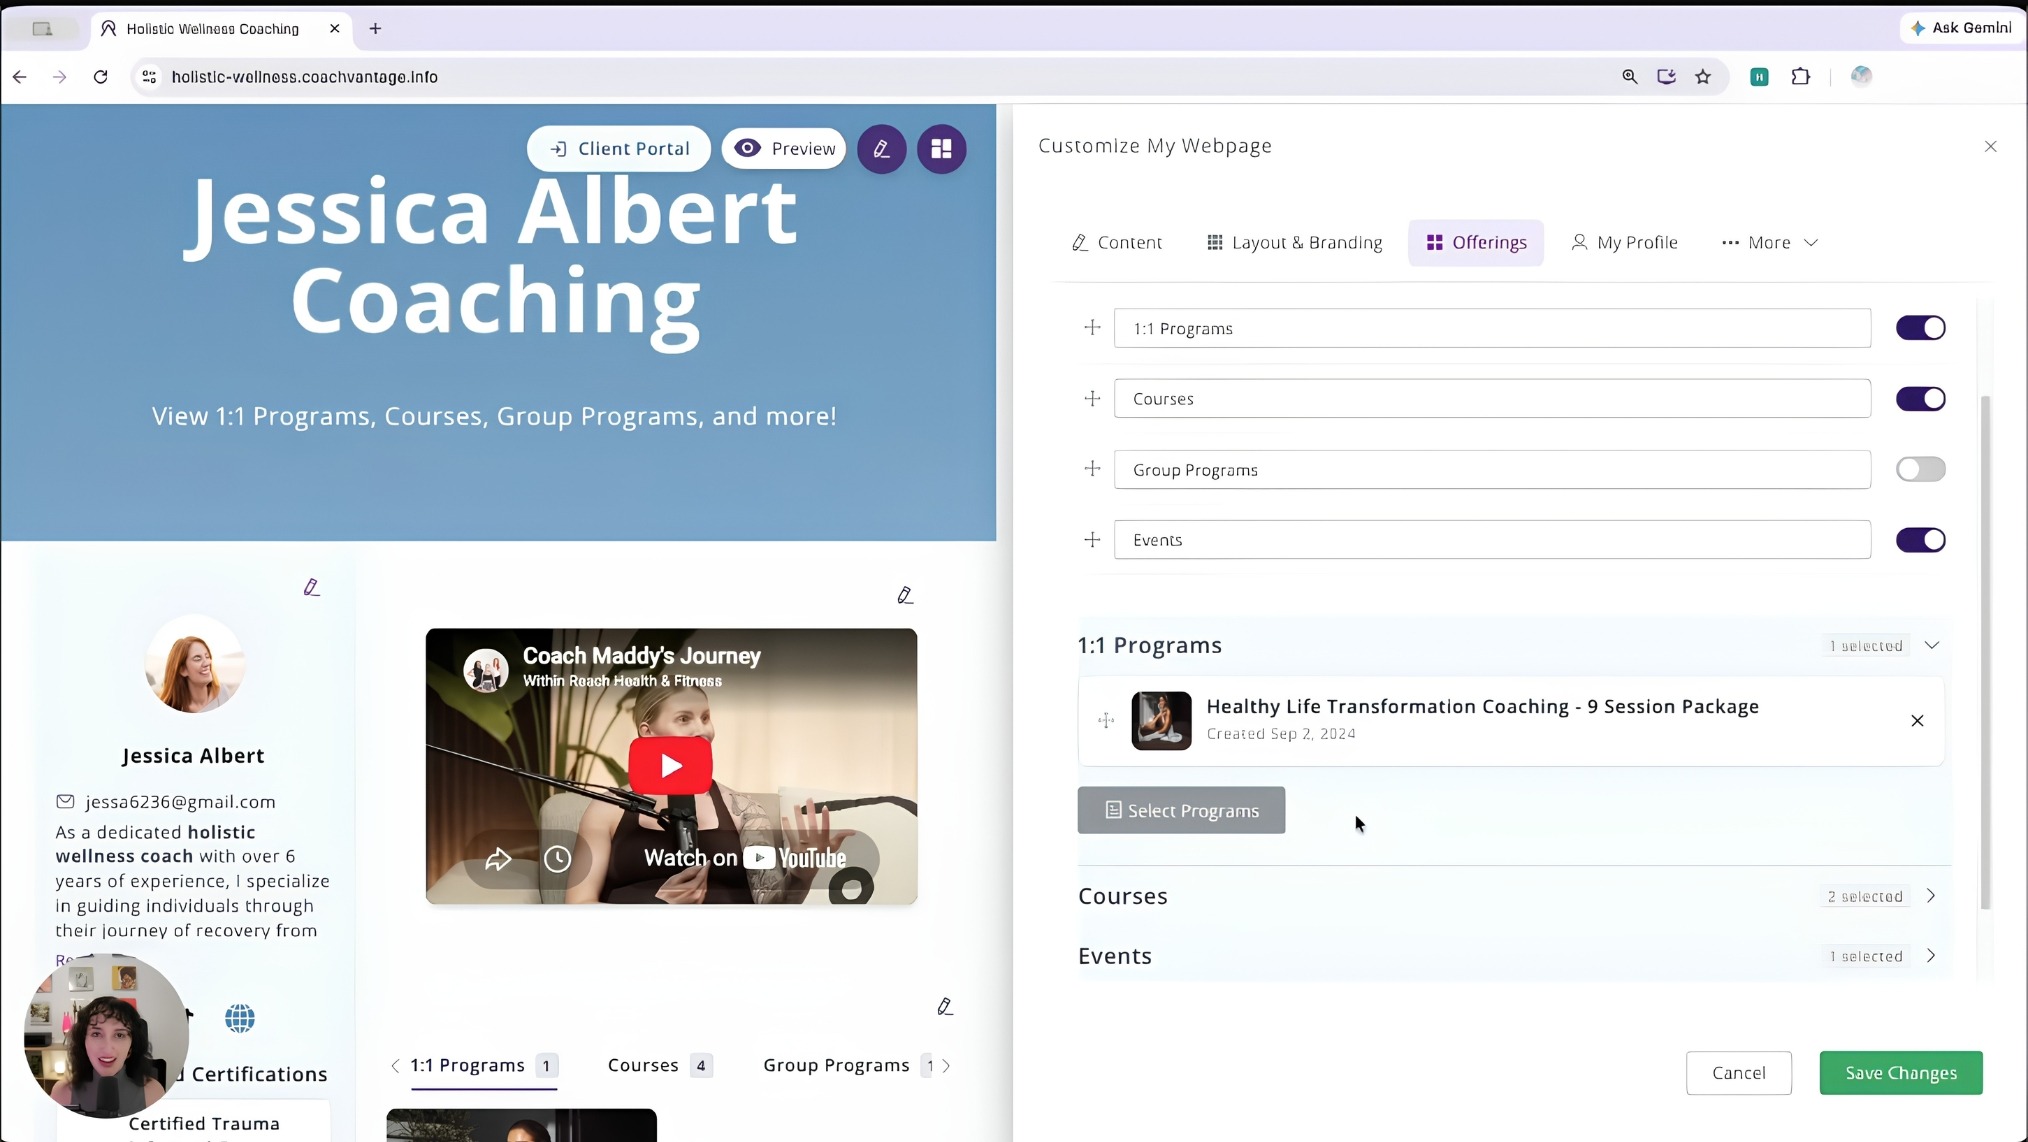
From the Offerings section, you can show or hide categories including 1:1 Programs, Courses, Events, and Group Programs, then drag and drop to reorder them. Expanding a category lets you reorder or remove individual offerings.
Manage Your Coaching Practice in One Place
CoachVantage automates your business workflows so you can focus on impactful coaching results.
Put your primary offer first. If a six-week one-on-one program is how most clients start with you, that should appear at the top, not buried below a free webinar.
Step 9: Add Client Testimonials
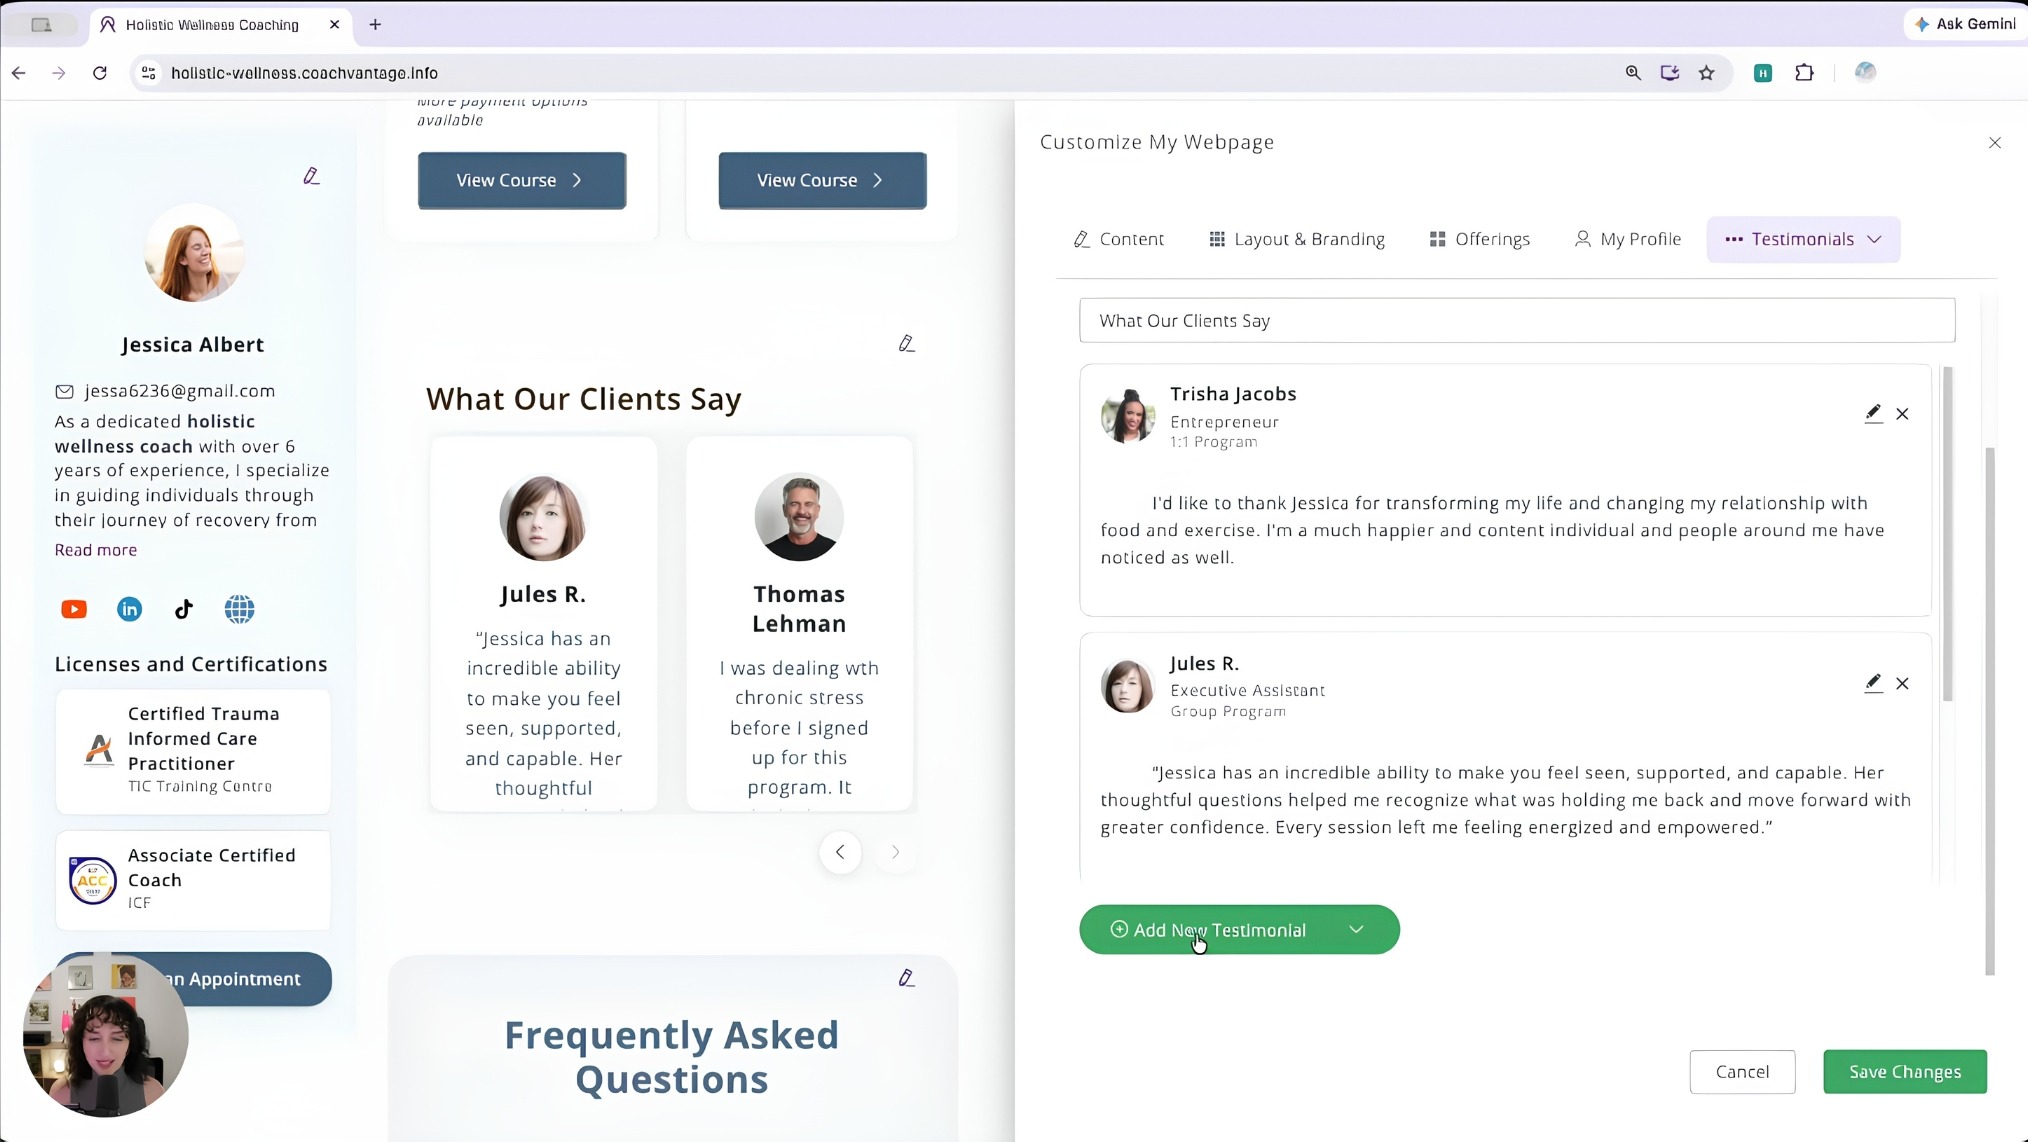
Go to More, then Testimonials in the editor. Select Add Testimonial, enter the client's name, image, title, and testimonial text, and save. You can drag and drop testimonials to adjust their display order.
Only publish testimonials with the client's permission, and use their actual words. Authentic, specific feedback converts far better than polished summaries.
Step 10: Set Up an FAQ Section
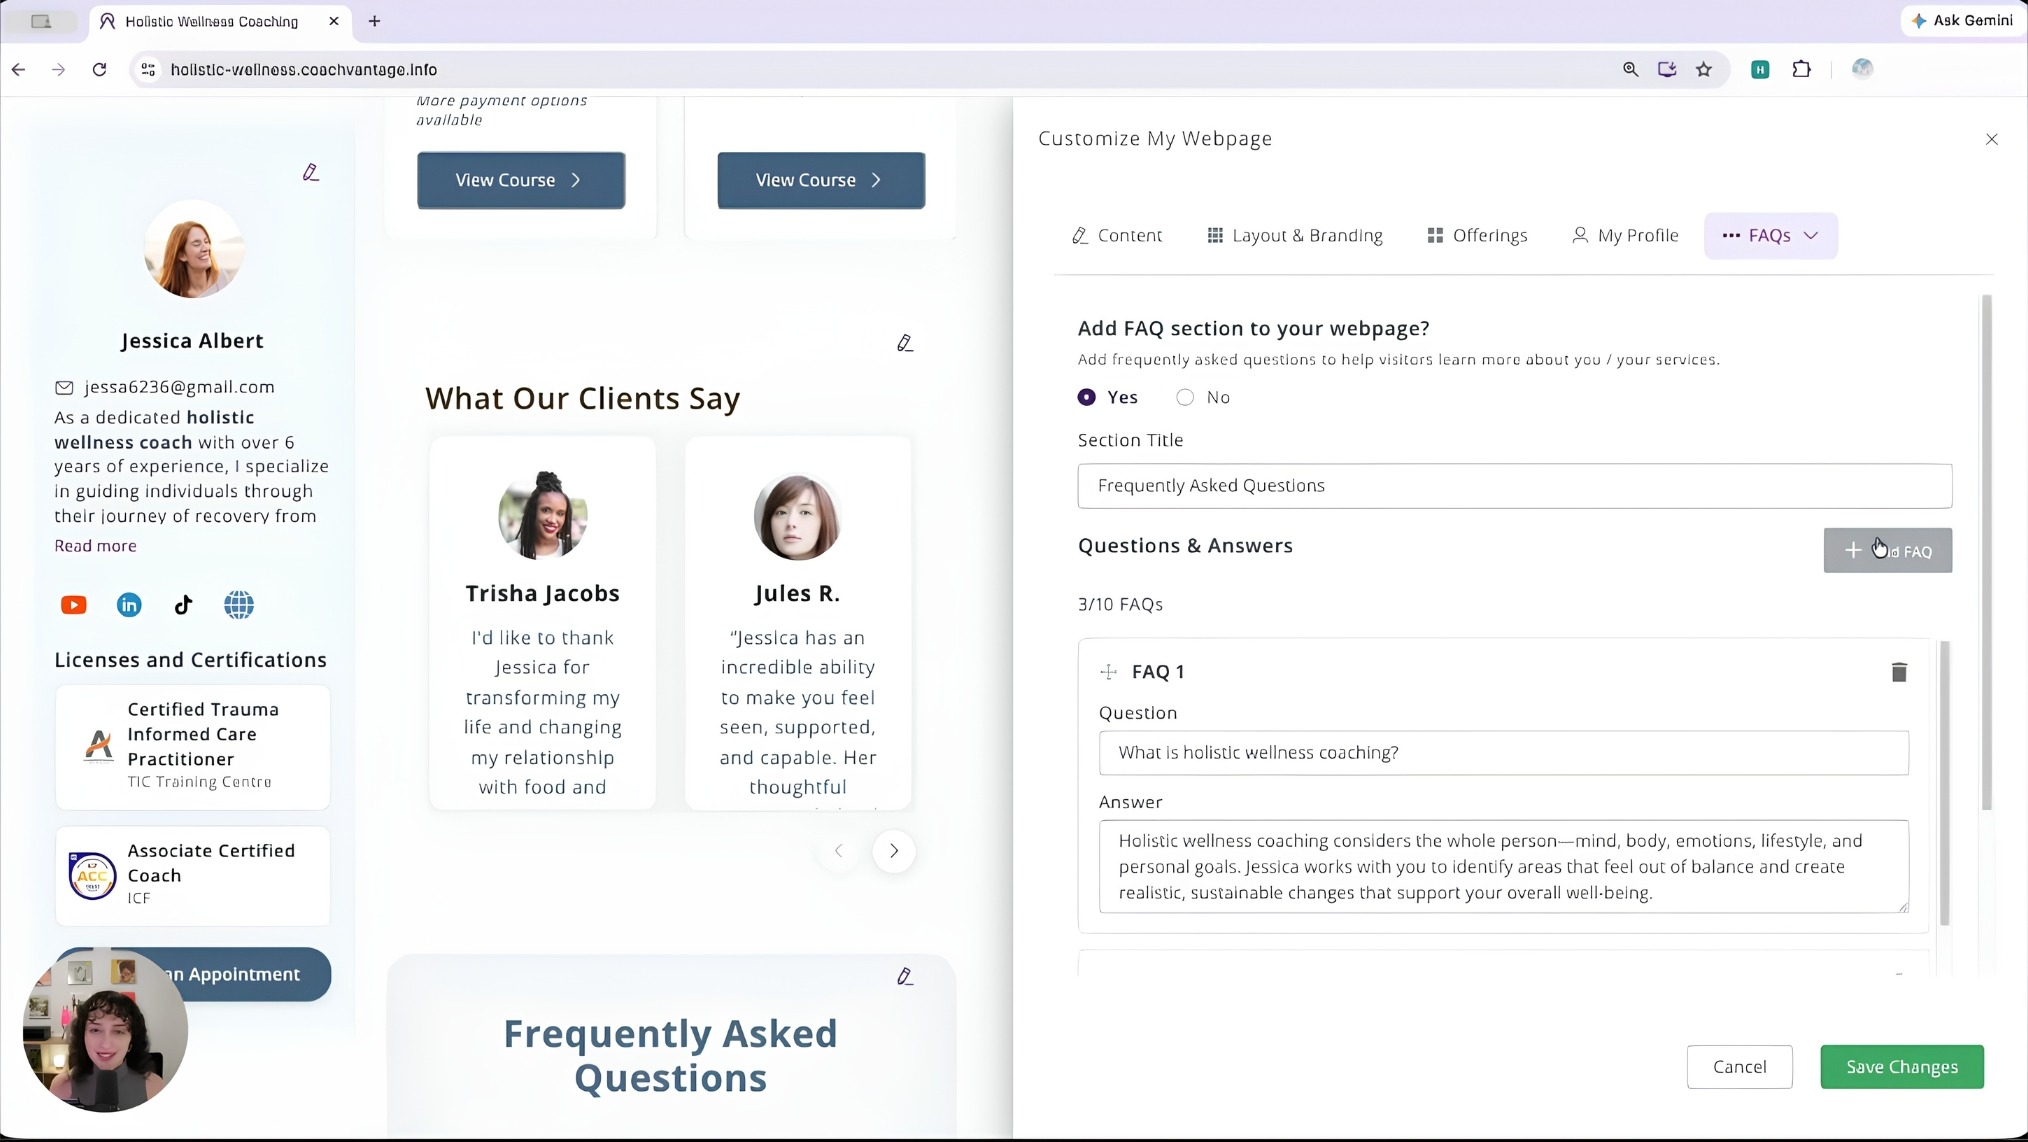
An FAQ section helps prospective clients understand your services, process, and policies before they reach out. You can add up to 10 FAQs and drag and drop them into your preferred order.
Cover the questions that actually come up: your cancellation and rescheduling policy, how sessions are conducted, whether you work virtually or in person, and what a discovery call involves.
Answering these questions upfront saves you time on back-and-forth emails and removes one more reason for a prospect to hesitate.
Step 11: Add a Booking Button or Embedded Scheduling Section
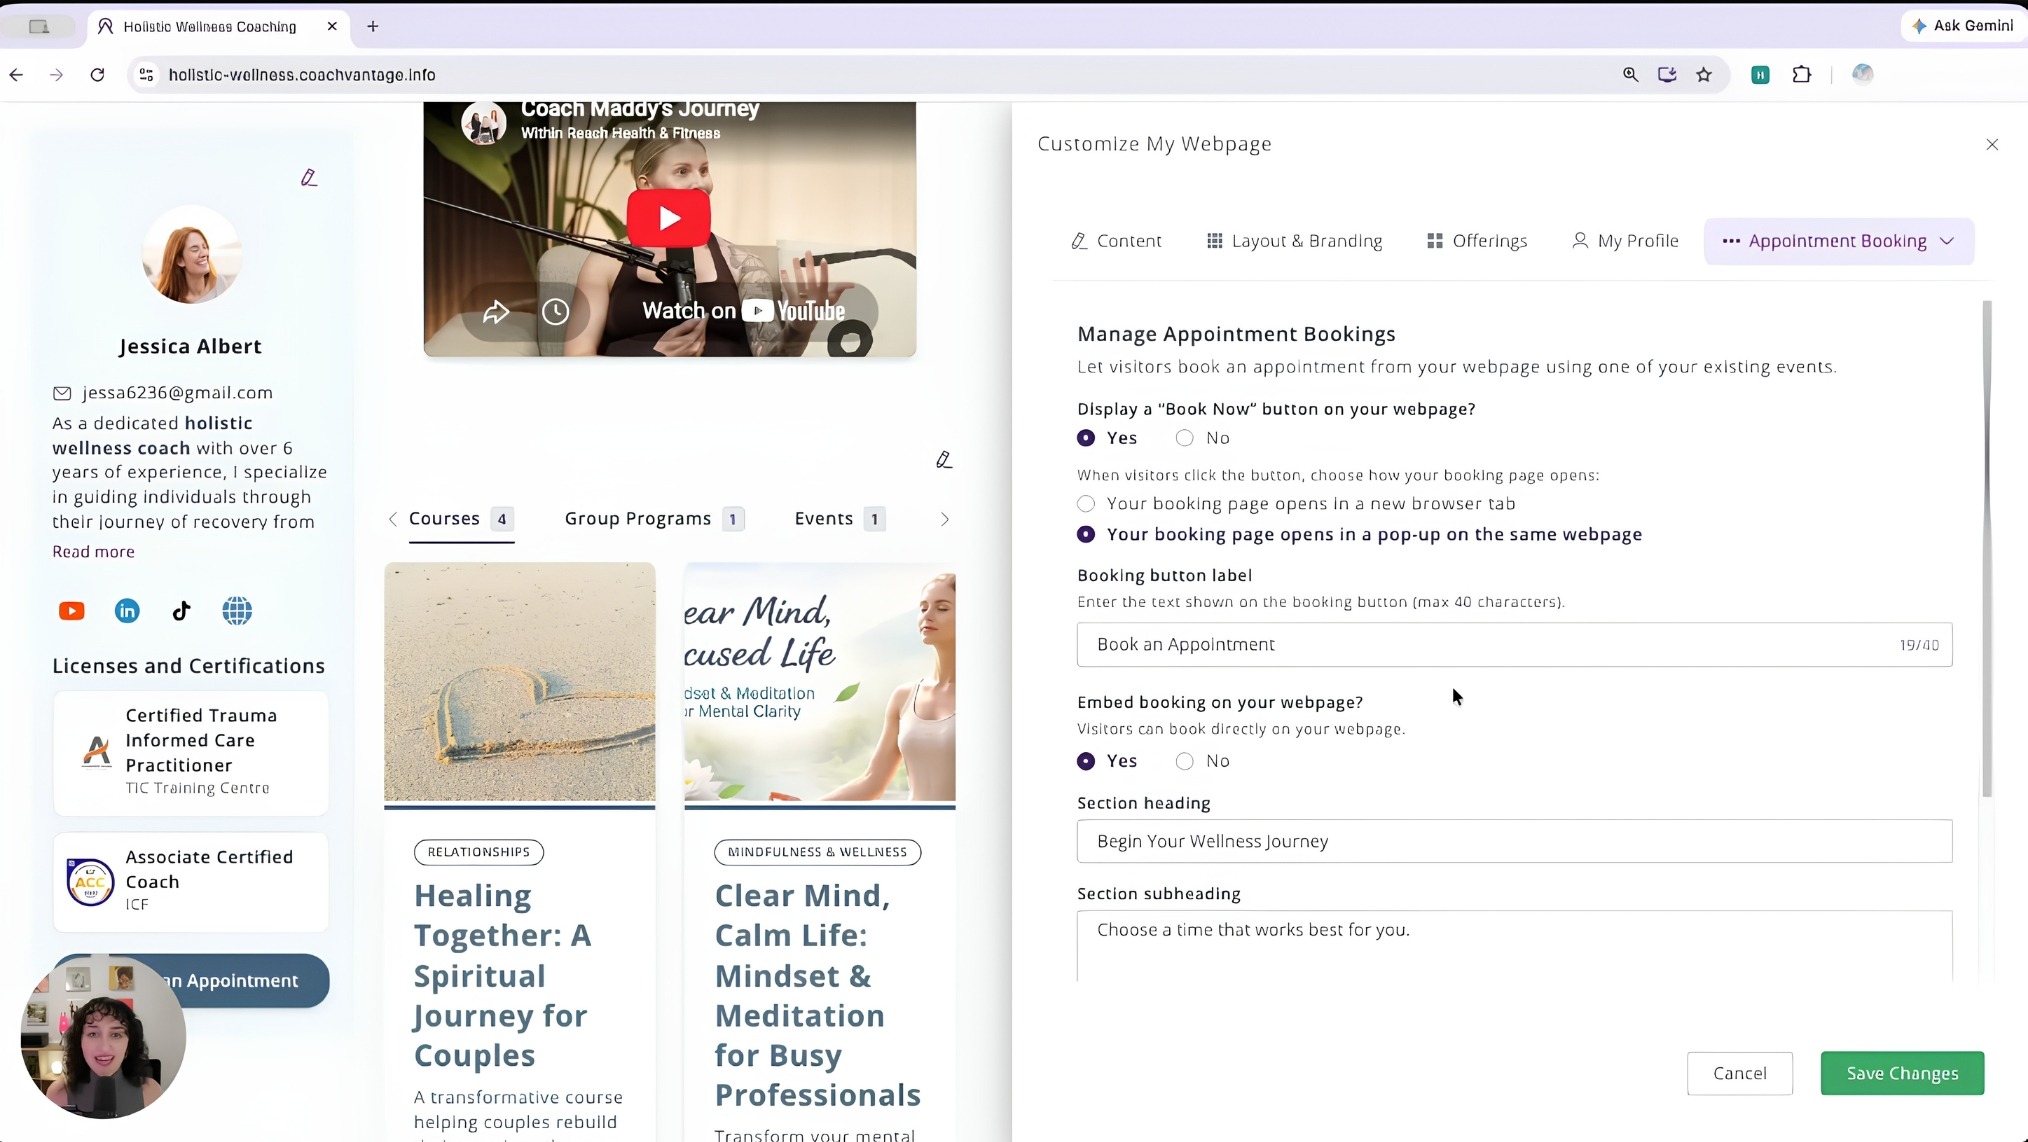
Under Appointment Booking in the editor, you can display a Book Now button that opens your booking page in a new tab or as a pop-up.
You can also embed the booking section directly on the webpage so visitors complete the process without leaving the page.
Use a label like Book a Discovery Call or Schedule a Consultation so visitors immediately understand what they're clicking.
CoachVantage handles the scheduling flow on your behalf, reducing the back-and-forth that typically comes with booking new clients.
Step 12: Optimize for SEO and Social Sharing
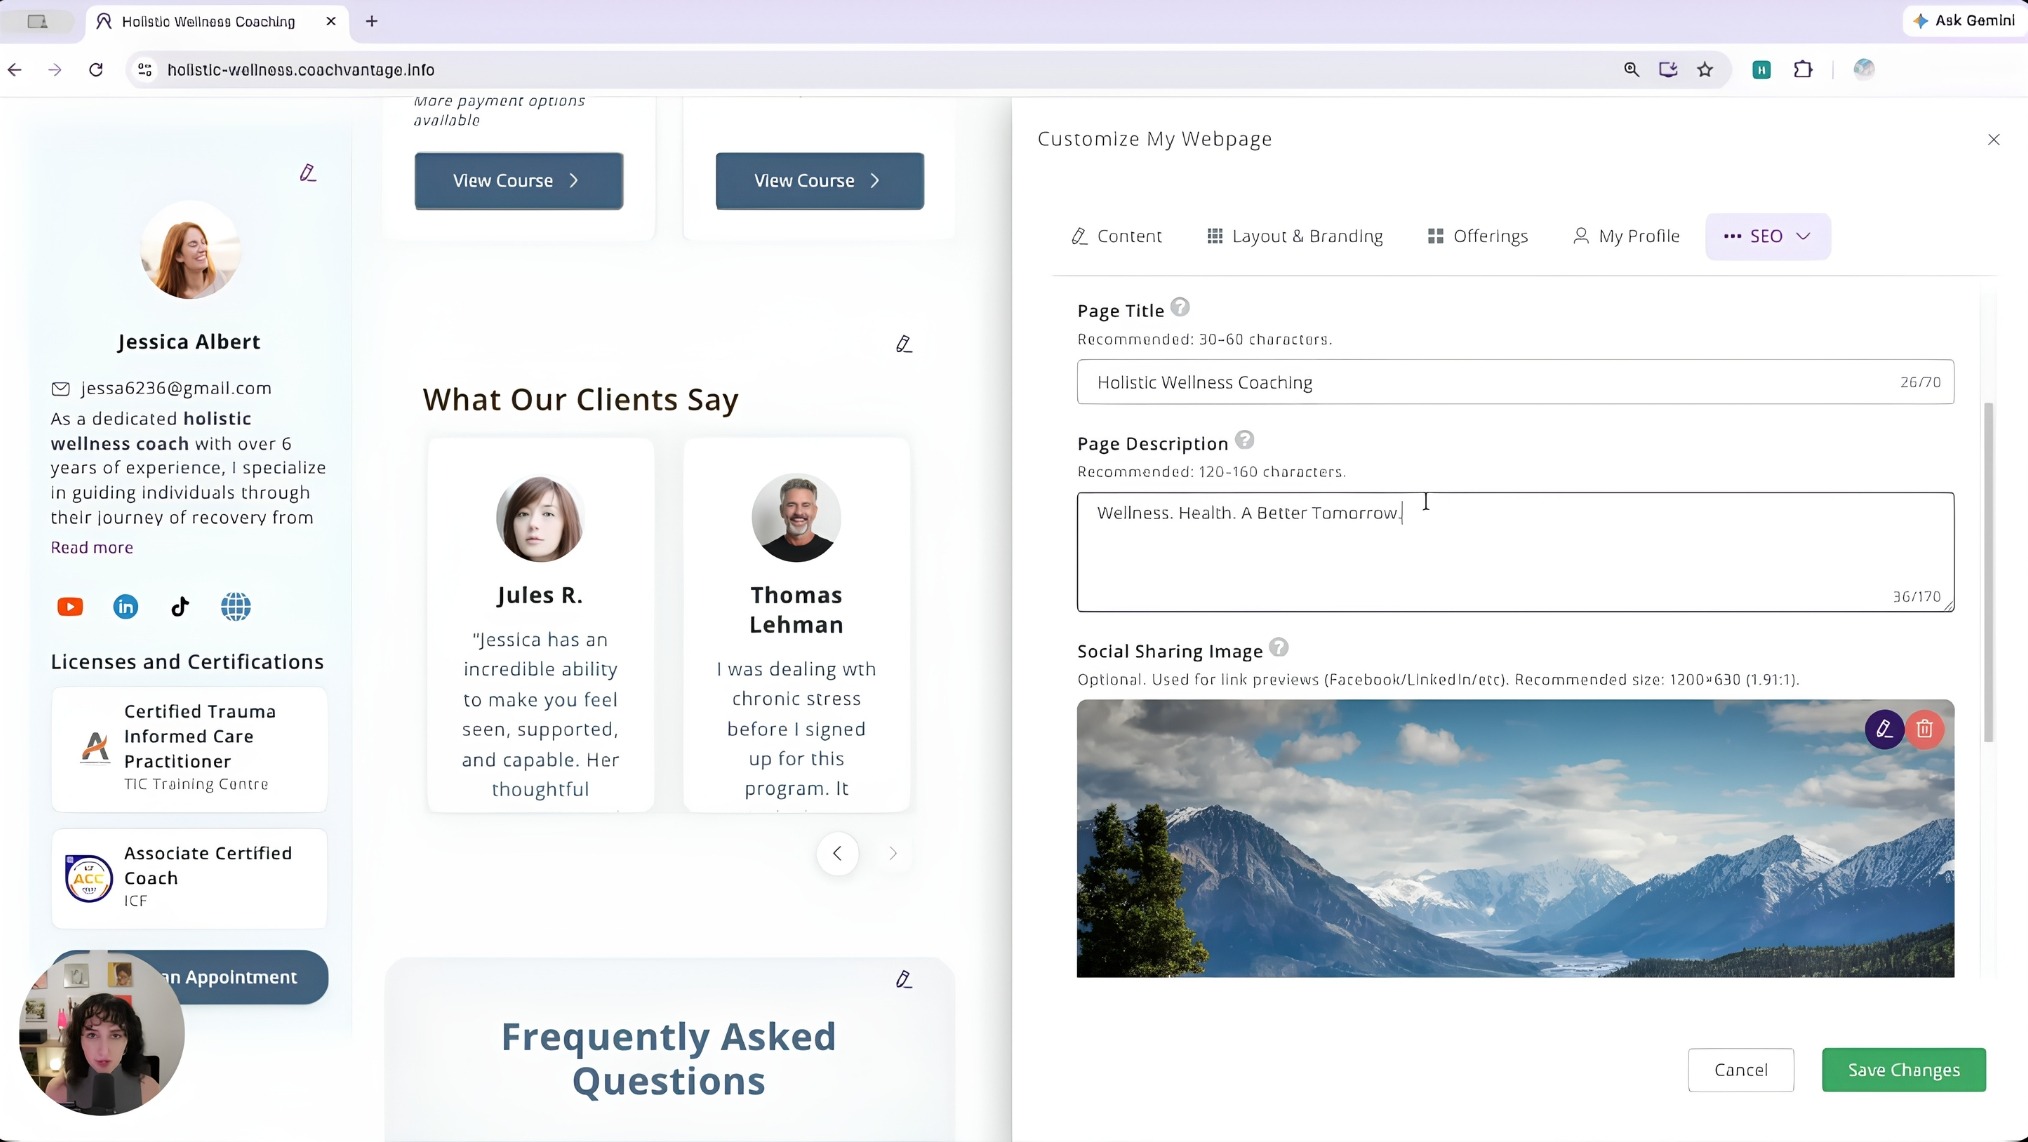
CoachVantage's SEO settings let you enter a page title of 30 to 60 characters and a page description of 120 to 160 characters.
You can also upload a social sharing image at 1200 x 630 pixels so your page displays correctly when shared on Facebook or LinkedIn.
Write your page description the way you'd describe your coaching to someone you just met. Name the problem you solve, skip the jargon, and make it specific enough that your ideal client resonates with your message.
Step 13: Preview, Publish, and Share Your Page
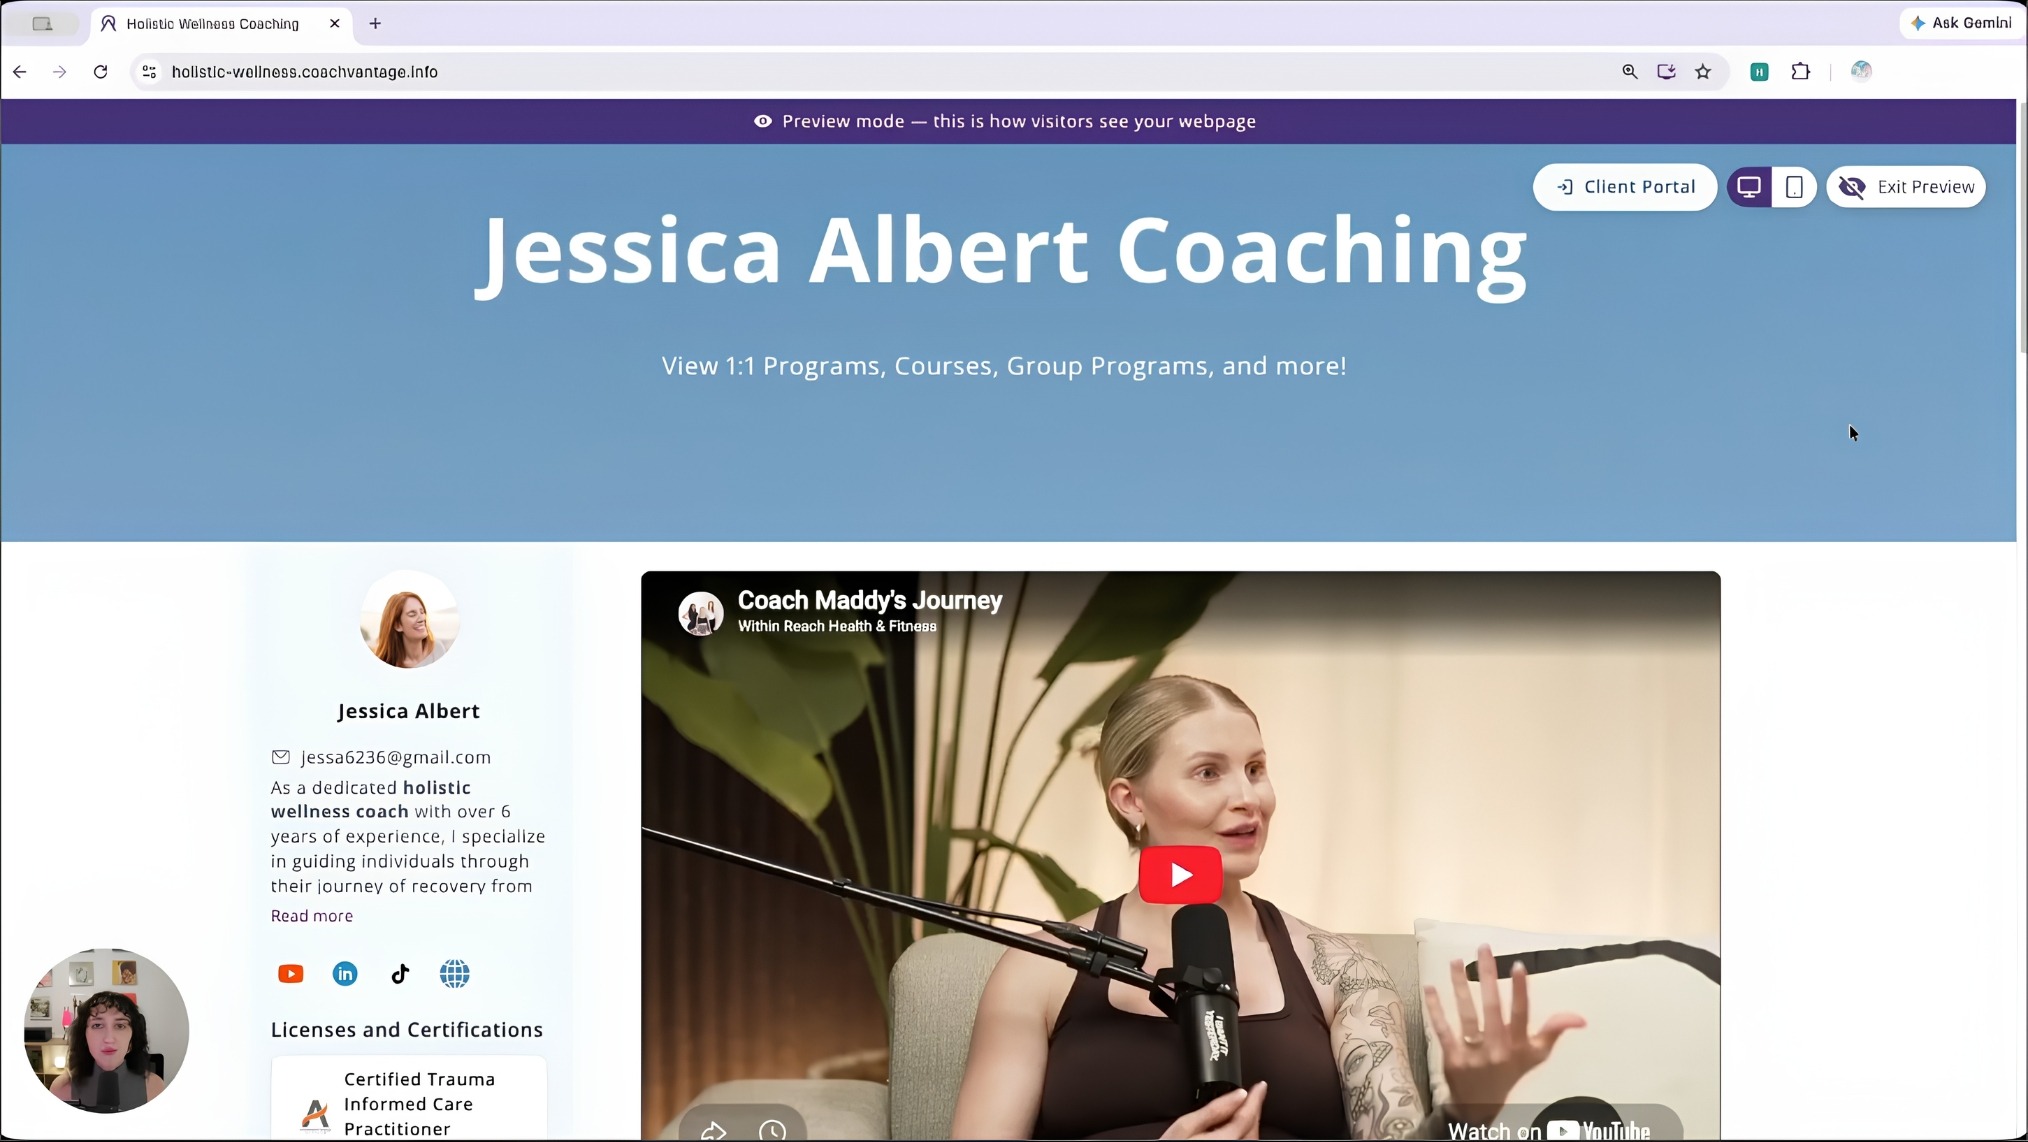
Before publishing, use the Preview option to check that your header is readable, your welcome video plays correctly, your offerings appear in the right order, and your booking button works. Check how the page looks on both desktop and mobile before making it live.
When you're ready, open the editor, go to Content, turn Publish on, and save. Your webpage goes live at the public URL shown in the Content section.
How to Connect Your Webpage to an Existing Website
Step 1: Copy Your Public Webpage URL
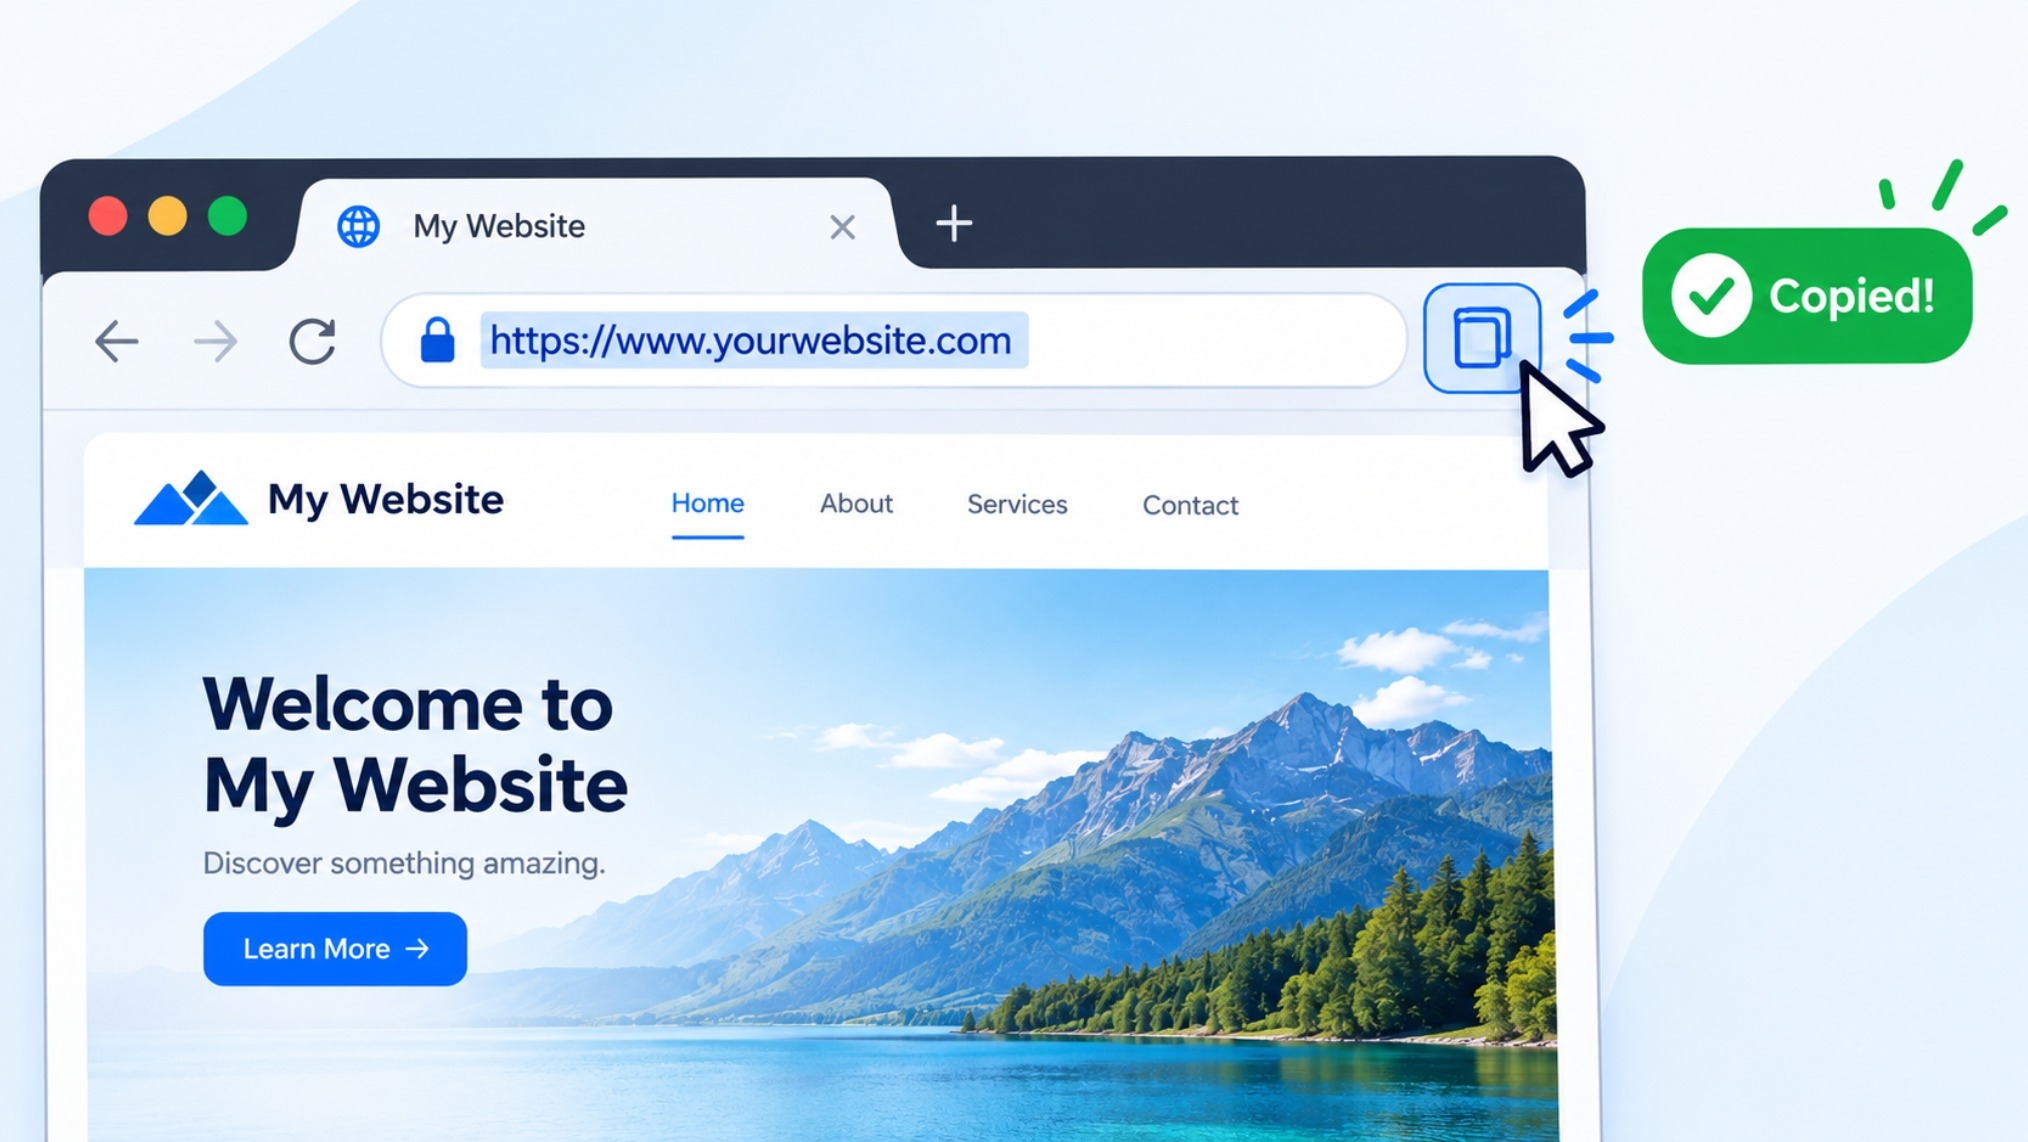
Your public webpage URL is displayed in the Content section of the editor. Copy and share it in emails, social media profiles, newsletters, or messages.
Many coaches start here before setting up a custom domain, and for good reason. It's enough to send prospects to a professional page with your bio, programs, and booking options already in place.
Step 2: Embed the Page or Add a Button to Your Site
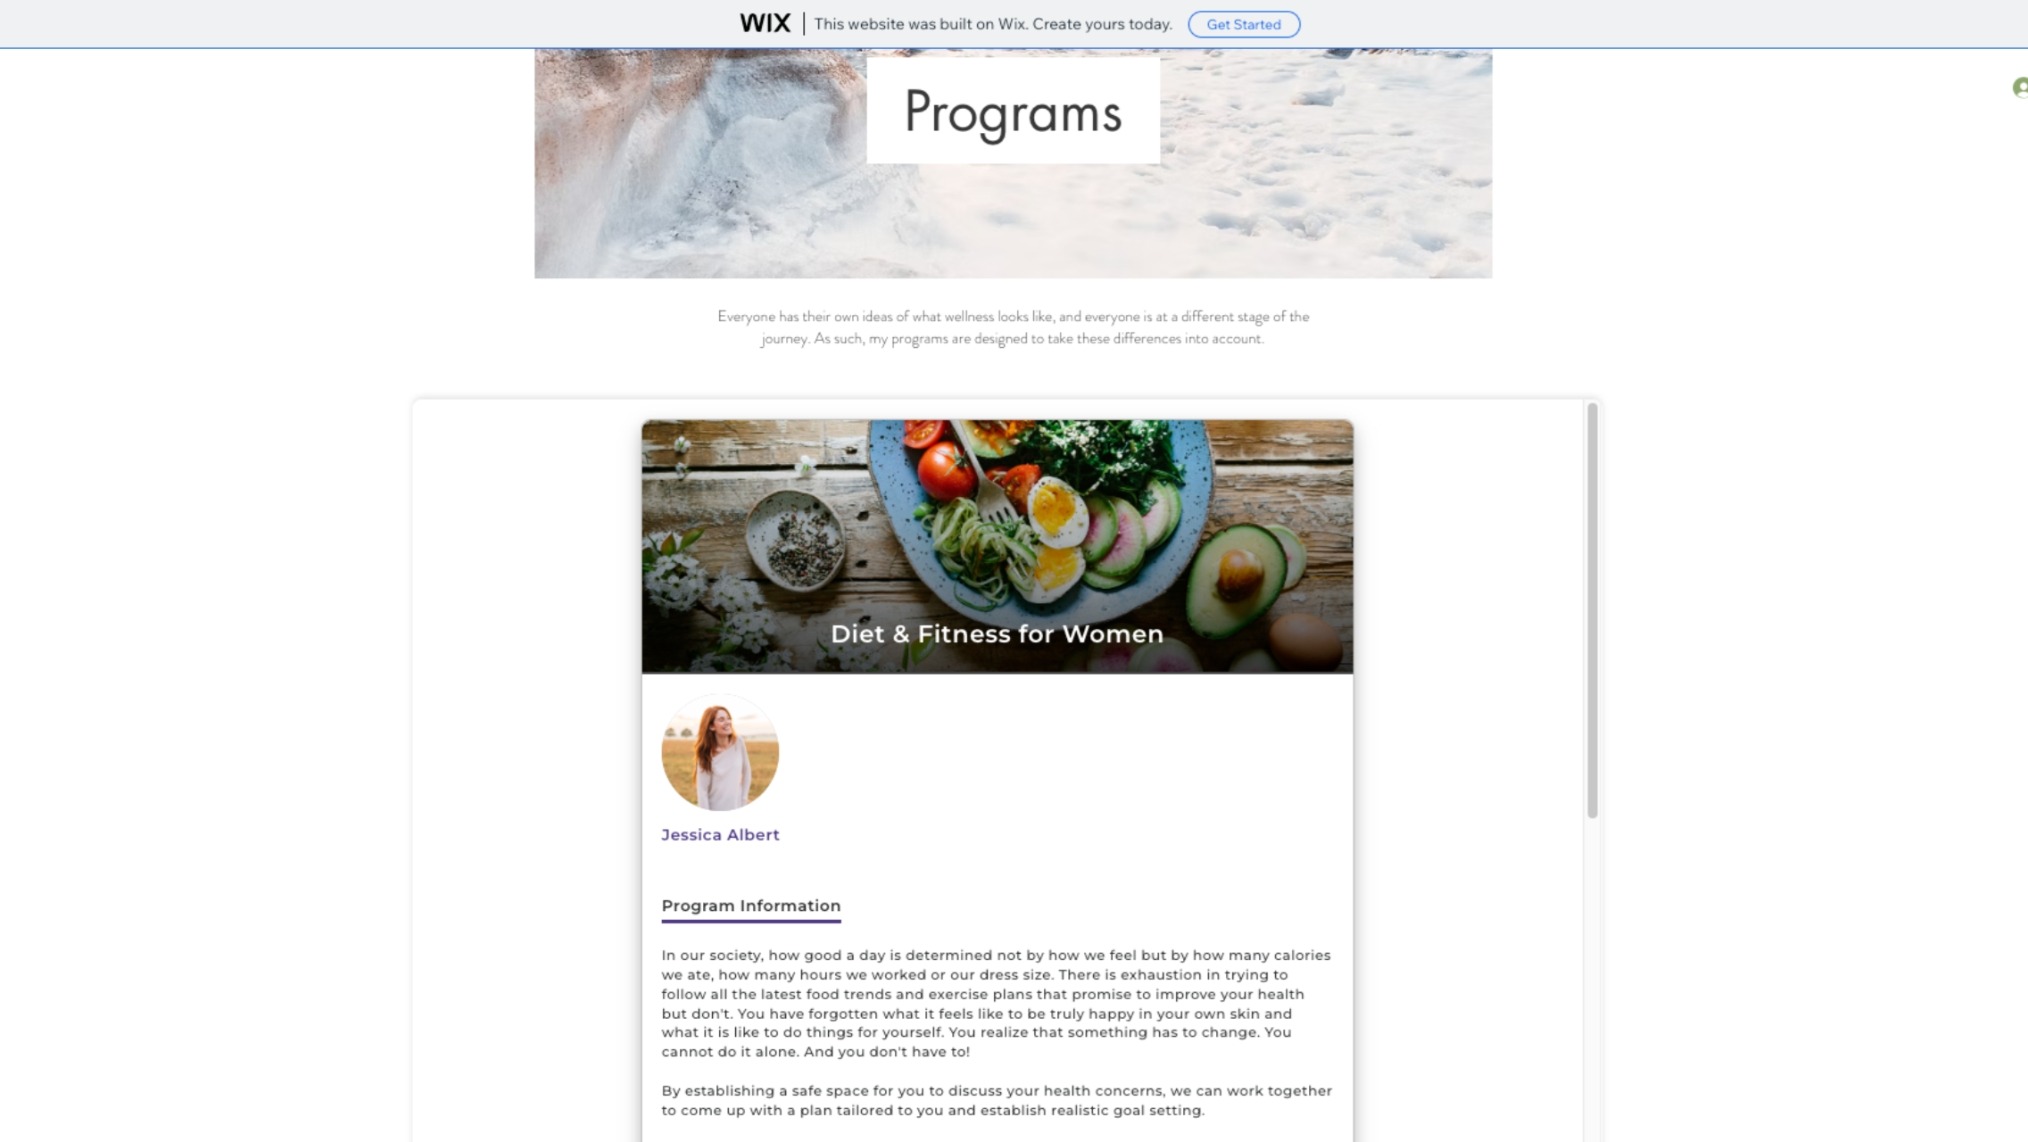
From More, then Website Embed in the editor, CoachVantage provides three options:
Your public webpage URL for direct sharing.
An HTML button code you can add to your existing site to direct visitors to your CoachVantage webpage.
An embedded webpage HTML code that displays your CoachVantage webpage within a page on your existing site.
On platforms like WordPress, Wix, or Squarespace, pasting the embed code into a page's HTML block is usually enough. If you're unsure where to place it, your website provider or designer can help.
Your Coaching Website Won't Build Itself
A coaching website that attracts clients comes down to three things:
speaking to the right person,
building trust before the first call, and
making it easy to take the next step.
Get these three things right, and everything else follows. If you want one tool that supports you with your coaching website, scheduling, programs, invoicing, and client management, CoachVantage has it all in one place.
Start your 14-day FREE trial today and see how quickly your coaching practice can look and run the part.
Frequently Asked Questions
Do I need a website for my coaching business?
Not to get started. Many coaches land their first clients through referrals and direct outreach. As you scale, a professional online presence matters more. A webpage builder within a tool like CoachVantage gets you there without the cost of a full standalone website.
How do you write a good bio for a coaching website?
Keep it client-focused, not coach-focused. Lead with who you help and what changes for them, then bring in your background and credentials. Write it the way you'd introduce yourself in a conversation, not the way you'd write a LinkedIn summary.
How do you get coaching clients online?
Start with a clear niche, a professional online presence, and one consistent channel, whether that's LinkedIn, Instagram, or a podcast. A website with a booking option makes it easier to convert interest into paying clients once people find you.
How long does it take to set up a coaching website?
A CoachVantage webpage can realistically be published in under one hour if you have your bio, a banner image, and program details ready. A standalone website on platforms like Squarespace or WordPress typically takes longer depending on design complexity and how much copy you're working with.
What pages should a coaching website have?
At a minimum: a homepage that communicates who you help and how, an about page, a services or programs page, and a clear way to book or get in touch. Testimonials and an FAQ section can live on the homepage or as separate pages, depending on how much content you have.
Can I use CoachVantage without an existing website?
Yes. Your CoachVantage webpage functions as a standalone public page covering your profile, programs, testimonials, FAQs, and booking options, all in one place. You can share it as a direct link without needing a separate website at all.
How to write the best bio for my coaching website?
A good coaching website bio should introduce who you are, your coaching experience, qualifications, and the types of clients you help. Focus on your target audience's needs by explaining your coaching approach, the challenges you help clients overcome, and the outcomes they can work towards.
Want More Coaching Clients?
Get Your Free Guide to Create An Irresistible Lead Magnet
And attract clients who want to work with you.
Get Your Free Guide Now
Glen Oliveiro
Founder of CoachVantage
With a pulse on the coaching industry, Glen personally engaged with hundreds of coaches to develop a platform that addresses their day-to-day challenges. A visionary entrepreneur, Glen is committed to revolutionizing coaching practices through the innovative solutions offered by CoachVantage.
https://www.coachvantage.com